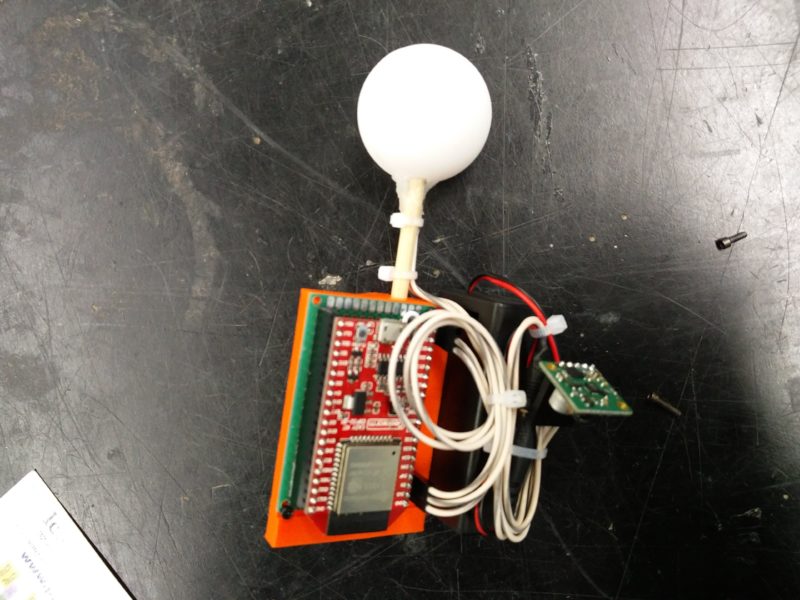
Everything (not) Working

I ran into some major roadblocks this weekend. I was still able to make significant progress but will need to work hard this weekend to wrap things up.

Assembly of the main structure is complete. By using smoke from another source or another light the infinity mirror effect can be seen.

One of the difficulties I ran into was that the knobs I bout wouldn’t attach to the POTs because the stems were too short after going through the .2 in wood frame. In order to overcome this I 3D printed new knobs that fit.


I was not able to finish the circuitry. To finish soldering I think there is one day of normal work left. To finish the programming I think there is one additional day of normal work. I should be able to do most of that this weekend.

The most catastrophic setback was that the atomizer fog machine I designed and printed did not work at all. This is a big problem as the lasers are not at all interesting without some fog. I have purchased the cheapest real fog machine I could find on Amazon.

The way in which the device failed was quite spectacular. The acrylic began to melt crack and bubble directly over the atomizer. This only happened at certain distances. I think this was cause by the waves bouncing back in time with the new waves causing a sort of amplifying feedback loop.

Everything Working (and a few known unknowns)

After the last class discussion, I really thought that giving multiple people control of a band of frequencies was going to be a fun, interactive way to present the “laser chadni plate” idea.

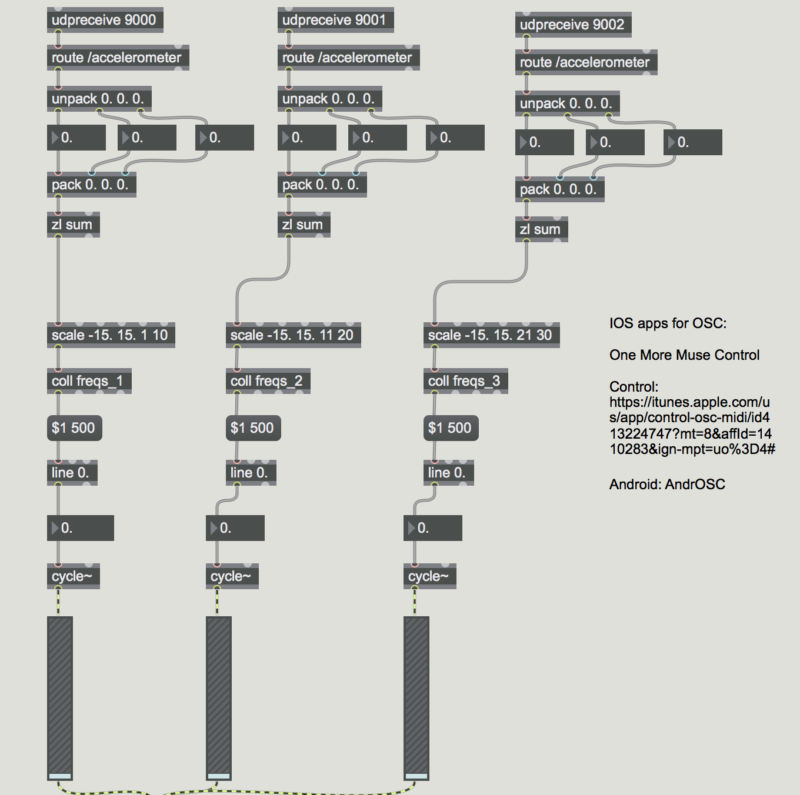
I’ve gone ahead and premapped three phones using OSC to a freq. range, roughly 300hz per person. As three “performers”, each band has an effect on the shape of the laser. Low/Mid/High have particular effects, so working together (or against each other) will inspire different shapes and results.

I’d like to test this concept in class before I go ahead and actually record the idea with a camera as a performance. There might be a few hiccups, but I’ve taken precautions to have it set up as quickly as possible. Each phone must download an OSC-enabled music app that sends accelerometer information. I’ve found a few free ones for both Apple and Android platforms. From there, the user has to plug in my network IP address and the corresponding port number.

After that, since the apps route the OSC packet differently, I’ll have to identify on each user’s phone what the accelerometer data is sent as. Usually it’s “/accelerometer” but it can vary based on how the app was coded.

From there, each user will mess around with controlling the shape. I’ll try “conducting” by bringing people in and out, using the volume mixer, or encouraging more or less phone movement.

I think the results are going to be pretty entertaining, but I’m expecting that I might need to add more or less frequencies for each person depending on what shapes come out, which is very easy to change.

After the results from experimenting with three phones, the last step is to find the most sleek presentation of the system at work. I will likely use a go-pro, and find a nice board/wall to project the laser on to. If the performers are in the shot, I’ll need to do a little bit of choreographing around the laser to further the overall presentation.


Failure, Recalibration & Iteration

This week I ran into a couple obstacles. I got the bleeding tissue paper in the mail and was trying it out. I was disappointed to find that the colors were not sticking to the canvases as I had hoped. I tried doing it on paper but the paper got too wet from the water. Finally, I decided to wet the paper on the canvas and the colors bled together well. I really liked that effect compared to the original effects made with the regular tissue paper. When I got the look that I like, I tried mod podging the tissue paper down. Then I let it dry. I made cutouts of mountains and put them on the back side of the canvas. There were areas that the light was showing through, so I had to recut the mountains so they were larger images that would stretch to cover those slits of light. The images below show the final product I created for this week.

The first image shows the tissue paper when it was wet, before I mod podged the tissue paper down. The second one shows the cube put together. There are cut outs on all four sides of the cube. The sides have not been glued together because I’m not sure if I want to keep this configuration. In the final, the light will not show between the edges.

Failure, Recalibration & Iteration – Duong Nguyen

This week, I tried to tackle the most difficult challenge of the project which is to actually build the structure of the infinity code. At the beginning, I was thinking of simply just building each infinite mirror (side of the cube), then at the end just simply add each side together to form a cube.

Re-calibration #1: However, in that design, for each mirror we need two acrylic sheet, if the two sheets are equal size, then the side and corner of the cube when put everything together will be empty. So I changed my design so that the inner sheet is slightly smaller than the outer sheet, therefore we can just glue all the outer sheet together to make the cube.

Re-calibration #2: I have two structure for the inner sheet, where the first iteration is the inner sheet will just be in the center of the cube. But then I need to make the structure for the diagonal linkage to hold the inner cube. Second iteration is that inner sheet is not center at the middle but to near the corner which do not require any other structure and fit nicely inside the cube.

Failure #1: So I decided to use the second design of the inner cube. However I made a mistake in my calculation to not add the thickness of each acrylic sheet because when I glue them together it is very tight and I cannot put the LED structure inside so I tried to make a cube out of the incorrect size sheet.

So I have to re-cut the inner sheet, however, it turns out to be smaller than what I thought it would be, So I do not know if the infinity effect would be if the mirror is a little bit too small.

Failures and Successes with Glass Working

This past week has been an adventure in glass working without the proper tools. I started out following a few tutorials on how to cut glass bottles using various household supplies such as acetone soaked yarn, a candle, and finally some boiling water. Each of these involved scoring the glass with a diamond edged scorer and then rapidly heating and cooling the glass to create additional stress until the glass cracked along the line. All the tutorials made this look like an easy task but with each of my attempts I would get a partial cut up to the score line, and in trying to finish the rest of the cut, the glass would crack along the length of the bottle.

Failures 1 through 3: Not my picture but the general idea

After failing with these attempts I decided to wait until I got at least one proper tool for cutting glass and I ordered these diamond edged drill bits.

These drill bits made cutting the bottom hole but they did not come without many challenges. Getting the cut started and centered was a near impossible task as the drill bit would walk all over the glass until if finally created enough of a cut to steady itself. I tried to resolve this with a bit of cardboard to hold it in place but had limited success. The piece I may end up using for the final product has a slightly off center hole which causes the vortex to wobble slightly.

Displaying IMG_20180411_223757868.jpg

Displaying IMG_20180411_223719496.jpg

After the bottom hole I needed to cut a side hole to feed the piping through. This hole was supposed to be the same size as the piping but the smaller drill bits I had were unable to cut through the glass. Instead I tried to use the same drill bits designed for the glass but cutting on the rounded side surface caused additional stress which caused the glass to crack rather than create a clean hole. Luckily the crack did not propagate very far so I was able to patch it with some super glue and fill in the space around the pipe with some rubber putty.

Displaying IMG_20180411_234257598.jpg

Displaying IMG_20180411_234309538.jpg


Failure, Recalibration & Iteration

My project is making a light painting with a robot arm . This week went well and I got a lot of stuff working, but some things need improvement. First I finished making the end effector for the robot arm, along with 2 different sized lights to put on the end of it.

Then after writing the program to control the arm and move in a pattern I attached the end effector to arm tested it out in a light painting. Below is a still picture of the arm and below that the light painting is shown.


Overall the painting turned out very nice, however there are some improvements I need to make. I need to cover orange and red status lights on the ABB arm and the esp32, roll down the shades for the window in the background, and better center the frame. Otherwise I am happy with the progress so far.

A Summary of My Failure- Lauren Getz

This is an over dramatization of how I went from loathing my project, to becoming tolerable acquaintances with it.

To recap from last week, I presented my project right after the vortex of fire/water and was rather lackluster in comparison. Although art is in the eye of the beholder, I did compare myself to that project and wanted to improve from there. The professor suggested layering paper in some sort of way to create cool shadows. I scrapped my old idea and ripped out the lights from it super dramatically. This was my first failure.

New and exciting plan: use watercolour to make cut out designs and layer them to create a cool effect. I was thinking water color to see if the light would go through it and make a more colorful shadow of some sort.

So I made some mountains and some trees and try to experiment with layering them dimensionally. I think I am struggling to know what types of cut outs I should make and how to bring the content of the art to the next level. My creativity feels blank. Not good when taking an art class.

So then I realized I had to incorporate light someone (duh, light art). I made a sort of canopy over the cutouts in the hopes it would make some cool shadows. I don’t really know why I thought putting light on top of the cut outs would make a shadow fall behind them, but at the time I did.

Okay so as is apparent the shadows did not fall to my liking.  So now i’m thinking make the light source hidden behind a frame in the front and light it that way. I think that will work, I was able to kind of pull it off at my house, but the frame part fell apart and I was not able to bring it in. I feel better about my project moving forward, I think I know what to do. Prepare for next week cause things are about to get next level.

In summary, I failed at creating a good idea last week, but was able to work though a new idea based on ideas of other people.

Light Painting Failure

Charlie Brooks

This week I analyzed the aspects of the light painting that I want to do and decided that the hardest part/biggest unknown would be how to cut/shape the acrylic sheets into distinct shapes to make the painting.

My initial thought was to use a small serrated handsaw to quickly and freely cut the sheets on the fly. The advantages to this would be that the saw is inexpensive ($6) and can be used wherever I am assembling my final work. I purchased this small saw from Home Depot:

Small handsaw from Home Depot

I attempted to cut these colored acrylic samples that I received earlier in the week:

5.5″ x 3.5″ colored acrylic samples

I began cutting one of the samples both along the edge and along the flat side. After cutting in each direction for almost 5 minutes, these were the results:

Acrylic cut along edge
Acrylic cut along flat side

Both methods showed me that a saw wouldn’t cut the acrylic very precisely or quickly. The saw produced a lot of dust and left these white streaks on either side of the cut. I would need to investigate another means of cutting acrylic.

I did a google search and found this cheap ($8) tool for scoring acrylic sheet. This tool, coupled with a straight edge, created a scoring mark that can then be snapped along a table edge to create a precise, clean break. This method leaves no white strain marks and produces no dust. Also, the tool requires no power or special materials so it can be used anywhere.

If this scoring tool doesn’t work as intended (it is scheduled to arrive Thursday, 4/12) I know that I can use the laser cutter in Washburn to precisely cut my acrylic. This would be the most precise means and would allow for me to cut unique shapes and even put the holes for the fishing line all in one step. The downside to this is that I would need to cut all of the pieces at once and wouldn’t be able to make different shapes on-the-fly, which I think I will need to do to make a really nice light painting.

Failure, Recalibration & Iteration

I had a few issues with my project but I was able to fix most of them. First, I incorrectly counted how many paper balloons I need to fold for a certain color and needed to order more origami paper yesterday. Now I feel like I am behind at folding because I have to wait for them to come in the mail. I also got the LEDs in the mail earlier this week, but they are 3 different brightnesses which I hope won’t affect how the final product will look (I have yet to test it out since I just got them). Other than that, everything else is going well! I found out how to hang them and because they are strung on a wire, they are easy to move if they are not sitting in the right place. So far I am happy how it is looking and am very excited to put it all together when I’m done folding! So far I folded 400ish out of the 780 that I have to do.

https://drive.google.com/drive/folders/1-5LzIKVrCAugX2kiGrUQCgoQy16jK6lW?usp=sharing

(It wouldn’t let me upload my images so I just put them in a folder on google drive ^)

Failure, Recalibration & Iteration

To begin my process of failure and recalibration I did some tests with my water atomizer once it arrived. I I found that the device wasn’t producing as much mist as I wanted it to and that The laser did not have as good a reaction with it as it did with smoke. I am hoping that once the box is built it works better because the humidity will be trapped inside.

View post on imgur.com

I laser cut all my parts earlier this week. I ran into some trouble when cutting them because I cut them reflective film up and the film melted in weird ways I then had to peel off the etched film where I rastered images into the sheet. This did however result in a neat rainbow effect of light refraction where the etching happened.

I also ran into trouble with tolerances. Part of my design involved fitting a smaller wooden box into a larger one. I had to sand down the smaller box once it was built in order to get it to fit inside the larger one.

Finally I did some preliminary testing before painting and assembly. Here are the results of those tests.

View post on imgur.com

As a result of these tests I found the laser could shine out of the air vents in certain configurations. I may need to engineer a light blocker that does not restrict air flow to make it safer.