A Wave to Hope

My final project is made out of 780 origami balls strung through 26 LED fairy light strips. All arranged to create an image of an ocean wave. Once I decided on doing the origami mural for my project, the very first thing I had to do was decide what image I should create. Playing around in photoshop using a canvas only 30×30 pixels, I created this image of an ocean wave.

I cut down some of the images and put it all in excel to then count how many balls I actually needed to fold and how many for each color. I put a letter in each box for each color and used control F to find how many there are of one letter, thus helping me find out the number of balls for each color. Then for each column, I counted how many balls I needed in all three colors for one strand of LEDs. To make sure my counting was correct, I added up all the numbers in each column and made sure they added up to 30 (because there were 30 lights on each strand). Then to keep track of which ones I threaded on the LEDs, I made them green in excel. To keep track of how many I was folding, I makd a sheet of tally marks for each color.

Afer folding all 780 balls, I blew them up and poked holes on the other ends of the balls so I can string an LED through. I did this by attaching a piece of a thicker wire to the ends of the LEDs and using it almost like threading needle. Doing this I discovered the LED wire was longer than the 30 balls on each strand if they were stacked up on top of each other. To fix this problem, I twisted the wire between every single LED to make sure every ball has a light and that they will be side by side. At the ends of each light strip, I bent my threading needle so that it would hold all the balls in place. After that, I put up 26 command hooks and hung all 26 lights next to each other.

I realized they were not all aligned perfectly at the bottom or at some places in the middle even if the very tops were all aligned. So I went back to each individual strand and either untwisted some of the wire between the LEDs or twisted it even more. After doing this, I got the exact image I was looking for.

I was very scared at first of this not working or not finishing on time. Making one ball took about 2 minutes ( 1,560 total, or 26 hours). Then poke holes in each ball and stringing them on one strand of LEDs took 1.5 hours each (for 26 strands~40 hours total). After calculating that, I was worried I would be in a rush making it and there would be no time for any errors. Yet I got help from some friends to help fold and I was able to finish earlier than I planned! I had to thread them all on my own though, but I just went home one weekend to work on them straight and got almost all of them done. I didn’t have too much trouble with this project, just that it took up ALL of my free time.

Here is a video of how I did this whole project

https://drive.google.com/file/d/1RM_OOTnfzRV0aE1ulxDnkiQEsjsmQ86R/view?usp=sharing 

I am beyond proud of how well my project turned out. I created an ocean wave because of it has a very special meaning to me. Growing up, every summer I would go to my grandparent’s house and stay there for almost all of the summer vacation. This house has been in my family for over 100 years but recently we had to sell it, due to recent storms destroying our land. Our whole family was in tears letting this house go, especially my grandpa, as his dad built the house. Therefore I created this ocean wave to represent our beach and ocean and dedicate this project to him.


Polish and Present

This past week I finished stringing all my origami balls on LED lights and shortening the wire in between each strand so the balls with lay directly on top of each other. I realized some were not all the same length at the bottom so I had to go back and make sure everything was aligned so you could fully see the ocean wave that I created. I am so happy how my project turned out and am very proud that I stuck with it and finished it all on time!

Here is what it looks like with all the lights off. I like the fact that you can only see the image of the wave if the lights are turned on. (unless you know what you are looking for)

Everything Working

So far everything is going well! This past weekend I finished folding all 780 origami balloons and started to string them on the LEDs. So far I have about 10 strings done but I’m not hanging them all until I string all of them. Even though I made the balls back to back on the string, some are different sizes and some strands hang lower. So after I finish stringing them together, (hopefully by this weekend) I have to work on making sure they all line up and are the same length. I will do this by twisting the wire in between some of the balls.

Here is was it looks like so far with 6 strung up. You can start to see the curve of the ocean wave at the top! Again I just have to fix the bottom so they are all aligned up.

Failure, Recalibration & Iteration

I had a few issues with my project but I was able to fix most of them. First, I incorrectly counted how many paper balloons I need to fold for a certain color and needed to order more origami paper yesterday. Now I feel like I am behind at folding because I have to wait for them to come in the mail. I also got the LEDs in the mail earlier this week, but they are 3 different brightnesses which I hope won’t affect how the final product will look (I have yet to test it out since I just got them). Other than that, everything else is going well! I found out how to hang them and because they are strung on a wire, they are easy to move if they are not sitting in the right place. So far I am happy how it is looking and am very excited to put it all together when I’m done folding! So far I folded 400ish out of the 780 that I have to do.

https://drive.google.com/drive/folders/1-5LzIKVrCAugX2kiGrUQCgoQy16jK6lW?usp=sharing

(It wouldn’t let me upload my images so I just put them in a folder on google drive ^)

Maquette

For my project, I decided on making light up Origami. I did not want to fold paper cranes because when you string lights through them, they don’t light up as much. So I decided to fold cubes because they are brighter. Another thing I decided on was to fold them with the color on the inside and the white side on the outside. This is so that you can’t see what picture I created until all the LEDs are turned on. I planned out my image through drawing with pixels in photoshop and decided to create an ocean wave. I will be creating a grid 26×30 of origami cubes that will eliminate this image (hopefully)

Lights on
Lights of, LED on
Lights on
Lights off
Design

I am using up all my origami paper that I have so I have different shades of blue so I tried to add it to my pixel drawing to see if the different shades of blue look good or bad.

Shopping list

  • Lights (30 LED)x26
  • Paper ->  While, Black & Blue
  • Stand? string?

First week (1st-7th)

  • Finish Maquette
  • Fold all paper that I have right now (130)
  • Finish white paper

Second week (8th-14th)

  • Paper/lights should come in the mail by Monday
  • Fold 40-60 a day (60=2 hours) 
  • Aim to finish all blue

Third week (15th-21)

  • Finish folding everything by 20th/22ed
  • Start to string in LEDs

Fourth week(22-26)

  • Attach to stand, make everything look nice
  • 26th – present


Project Proposals – Brie Fiorentino

My very first idea is doing something with light painting as I really enjoy photography and thought this is a fun twist to taking photos. Soon after I signed up for this class, I had the idea to create animated light paintings, very similar to how Lucia Spinelli created. After finding her and seeing that she had already created something like this, I tried thinking of new ideas that I could do. I also got the idea just to track movement with light painting such as having someone dance with LEDs on their hands and feet and see what image I get out. Also playing with reflections that the painted light can create such as something like this photo:

Another idea I had was using a black light. Either a painting that looks all white but when you apply black light to it, you see a painting of a galaxy or something along those lines. But this feels too simple as well as I don’t have that much experience with painting so maybe I would create something digital in photoshop.

One final thing I am thinking is incorporating origami with my project. Maybe creating pieces that light up and give of cool shadows. Or creating a wall of light up cranes or cubes that aline to make a bigger picture.

My final Idea is taking wire LEDs and making either some sort of sculpture with them or rearranging them in a big clump but when it is viewed at the right angle, all the lights will align to make an outline of a shape or an image .

LUCEA SPINELLI – Light Artist

Lucea Spinelli is a New York-based photographer who was born in Italy in 1987.  Both of her parents were commercial photographers and had been taking photos ever since she was young. However, she didn’t go to school to study photography, but for philosophy and politics instead.  Yet, this influenced her artwork and says her studies gave her, “a language to understand the different realms of our perception, and question the objective nature of reality.” Spinelli likes to capture things that wouldn’t appear in reality but would appear in only someone’s imagination. She often refers to the light as “spirit portals” and creates images influenced by early “spirit photographers,” such as William Mumler and William Hope.8L4A5847_2.jpg

To capture these magical images, Spinelli uses the technique of long exposure photography. By leaving the shutter open on a camera, it captures any movement of light over a long period of time, making any source of light act as a paintbrush. She got this idea by taking a photo by mistake of her going up her stairs with the shutter open and captured all the light trailing behind her. She said the light looked like they were walking up the stairs on their own and loved the idea of bringing light to life.

LSHotelStitch_finalRi_14.jpg
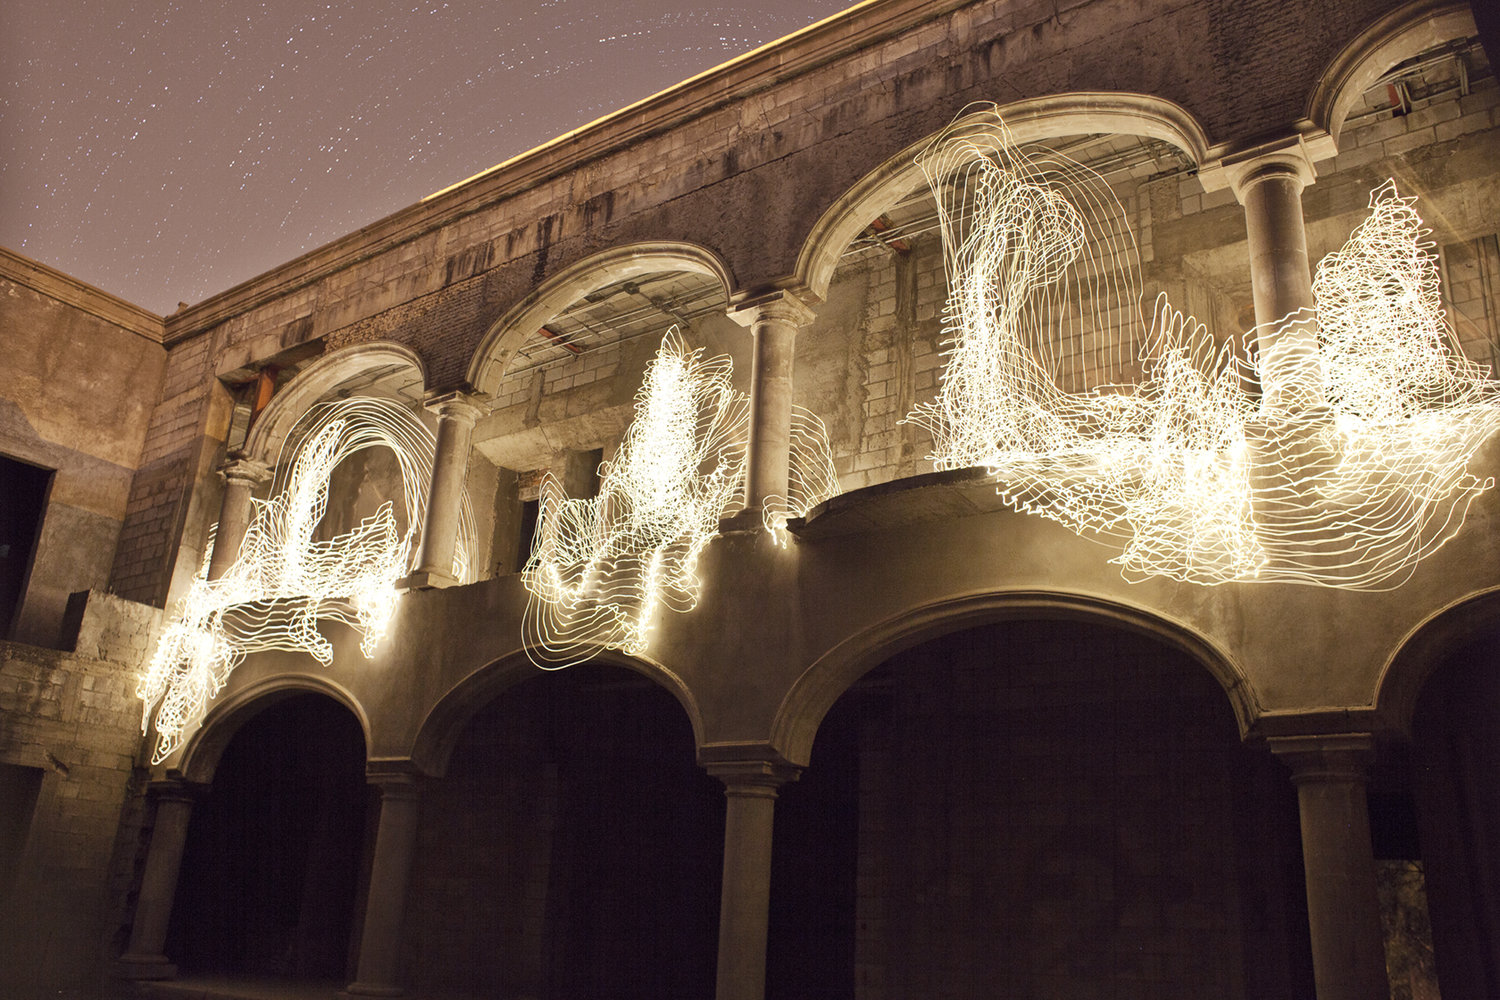
She used many sources of light for her photos such as battery powered fairy lights, pen lights, submersible lights, flashlights, and mirrors. But the most important part of creating her pieces is the background lighting. There needs to be dim ambient light, such as the moon or a streetlight, to illuminate the surroundings. Because these photos were made in such dim lighting, it was very difficult for her to see what she was doing. It required a lot of rhythmic movement and precise planning of each gesture that needed to be made to get the image she wanted.

Photosgraphé

Spinelli created a series of images that combined photography, moving art, and philosophy. The name Photosgraphé comes from the Greek word “light drawing,” yet she not only wanted just one drawing but an animation to give the light a mind of its own. Furthermore, she explains in an interview with Architectural Digest that she creates these animations because it “brings her accidents to life”. In one singular light photo, there could be a mistake, making the artist having to retake the whole photo. Yet with Spinelli’s animations, it allows her mistakes to be intergraded in her work and create such mystical animations.

Isle 800w.gif

Swinger-800.gif

Jellyfish.gif

BellJar.gif

Introduction and Art Portfolio – Brie Fiorentino

Hi!

My name is Brie Fiorentino and I am a sophomore majoring in Biochemistry. I chose this art practicum because I really enjoy creating any form of digital art. I mainly use Adobe Photoshop and Adobe Illustrator to create digital paintings and artwork, but I also enjoy photography, video editing, and animation. I fell in love with art ever since I was in preschool and was always asking, “Can we have art time now?”. My mom even framed some of the things I did when I was only three years old. Back in high school, I didn’t take too many art classes, but did lots of art on my free time, especially for my robotics team. I did a very small amount of programming, electronics and actually building a robot because I was mainly on the team to “make it look pretty”. For example, I designed the team’s logo/ t-shirts and made posters, flags, and banners.


https://drive.google.com/file/d/1WHXGqKyCy6dyEeW1hcZYzNsNSIab8KAq/view?usp=sharing

One of my biggest inspirations for art is my grandfather. He is a phenomenal abstract artist and I have always looked up to him ever since I was little. Recently he has been diagnosed with Alzheimer’s Disease and can no longer create any more artwork. Yet growing up watching him paint and create crazy sculptures, he made abstract art my favorite type of art because no abstract painting is looked at the same, it’s all how an individual sees it.

Another creative art I really enjoy is music and dance. Music is very big in my family and everyone knows how to play an instrument. My dad is a professional guitar player and is a major reason why I love music so much. He taught me how to play the piano and ukulele when I was a kid. I also love to dance. I am on a dance team at WPI (separate from WPI’s dance team The Rockets) and often perform on campus throughout the school year.

Recently I have been creating some double exposures in photoshop and I am very proud of how these turned out. I love the look of watercolor or smoke blended into an image of a face.  

Also, here are some of my favorite pieces I created in my art classes here at WPI

https://drive.google.com/file/d/1KTNWCwQNhKRJpOrvDWTubdv75JdX6D-c/view?usp=sharing

https://drive.google.com/file/d/10mIOjL7U8jLbymDAGHemdjCAGBiiaYJw/view?usp=sharing

https://drive.google.com/file/d/1Xx2abT9-tT-wXU2KMPxseMDTjMgPN4V3/view?usp=sharing