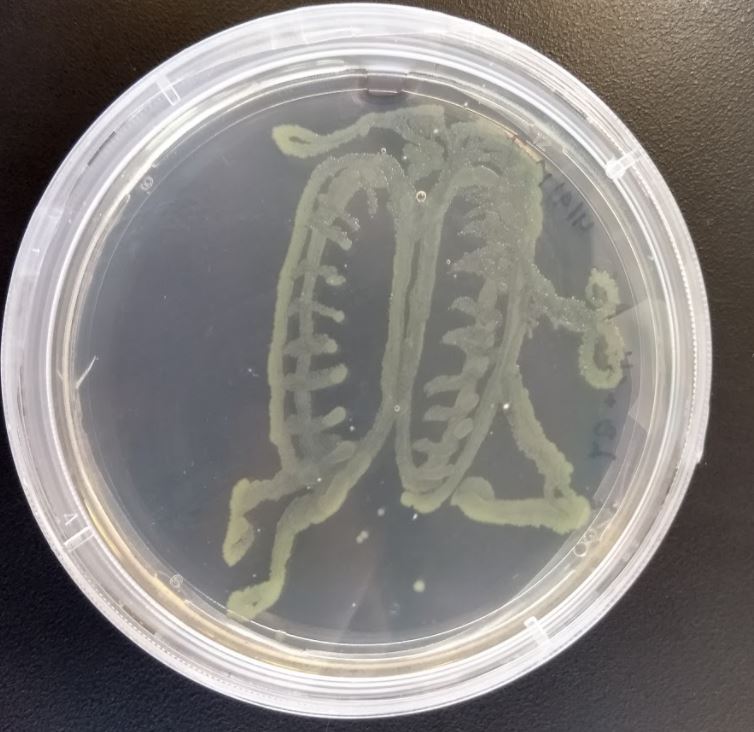
Over the course of the last 7 weeks, I created artwork using glowing, growing bacteria. Below are some images of results, as well as GIFs of my larger pieces showing the bacterial growth day after day.

GIF:

GIF:
GIF without words:


Light Art Practicum at Worcester Polytechnic Institute
Over the course of the last 7 weeks, I created artwork using glowing, growing bacteria. Below are some images of results, as well as GIFs of my larger pieces showing the bacterial growth day after day.
GIF:
GIF:
GIF without words:
Yesterday morning, I had to do a lot of prep work to allow my bacteria art to be displayed to the class in the Goddard labs!
First, several days beforehand, I had to email a few professors to allow my art class into the Goddard labs. Professor Farny was instrumental in this; she agreed to supervise.
Along the way, I discovered that there was a “Darkroom” in the 2nd floor hallway. I moved one of the darkreader units inside & set up shop. I only needed one of the biology professors to swipe me in! That was much better than leading a class into the real labs.


After I had my room set up, I went back to Gateway labs to collect my art plates. I removed them from cold storage, carefully sealed them in parafilm, put them in a thick Styrofoam box, and transported them to the Darkroom in Goddard.


I put my materials in the room & tested the UV light on the Darkreader-


Everything was a-go!
After that, I took the class to Goddard to see the living, glowing agar art!
Hello Guys!
It has been quite a journey, with many obstacles and unforseen challenges, but I have produced glowing green & red bacteria art in petri dishes.
Follow this link to watch my art grow, to watch my art glow:
Here is a wordless version:
How I did it:


In addition to the above art, I also created another GIF of Bacteria Bird Growing:
Thank you all for making the class projects so diverse & interesting!
Hey Guys! Here are some Florescent Images I took!


I have decided to grow this arrangement of bacteria over a couple of days, taking a picture of the growth every day. These will be added in a series to create a GIF showcasing the growth of my art project.
I will also create another series using multiple agar plates to create a larger image, and create a GIF of that too.
In addition to that, I will be bringing the class to the lab to see the end result of both works of bacteria.
Tune in next week to see the results!
Hello all,
This week I am going to review everything I failed at so far & give a progress update:
The Yeast
Last Friday, I went into Professor Farny’s lab to expose my plates to UV light & make them glow.
The yeast do not glow with the intensity that I was expecting:


Fortunately, Professor Farny gave me some of her GFP Bacteria stock-

Microscope/ Yeast Glow Activation
Also, the original microscope I was using for images was not working:

I am now going to use the “DarkReader” UV panel to make my microbes glow:

Yeast Photo-Kill Exposure
I really tested this one- I left the yeast under the UV light for a solid 12 hours-
This is the result:

No Shebang! Plate is completely covered in yeast!
I am temped to try out my experiment tomorrow in bacteria; they are far easier to kill that yeast, so it might work.
Instead, I have recently taken to painting my new GFP bacteria on plates. I have a new theme to go along with the new microbe => Imagine if, after just the right dose of radiation, your bacteria mutated, became sentient, and started crawling out of the petri dish.

That turns into that:
I would like to set up my camera and take shots of growth, but that would require me to be in the lab, taking a picture every 15-30 minutes, for a solid 12 hours. I am thinking that I will make several plates with different stages of the “transformation” taking place, and line them next to each other on the darkreader.
(Concept Picture- I am receiving red glowing bacteria tomorrow from Professor Farny, and would like to use both colors in my art for contrast.)

One of the plates I poured agar into ended up with some bubbles, so I decided to go with it:

UPDATE: Day 2 Growth:


Hello all!
This week, I was tasked with making a yeast light art prototype. I decided to explore the painting technique this week, as this is a more sure bet than the long exposure, photographic technique.
Show and Tell–
Because my project uses genetically modified GFP yeast, I cannot transport it to class. I am, however, meeting with Professor Farny tomorrow- she has a lab facility in Goddard that can handle my yeast plates. I may be able to get the class access to the Goddard Lab to see the final work.
Instead of the show and tell, I documented my process & results.
To make my GFP Yeast Prototype, I first grew green florescent yeast in a liquid medium. I also grew non-GFP yeast in another tube.

After that, I selected a petri dish with yeast-agar inside of it, and pipetted both yeast solutions into the dish. I did so randomly, so the yeast could grow as they pleased. I mixed the yeast strains so that they could grow together and compete for space on the dish, naturally producing complex patterns in the process.
This is the dish @ 0 hours:

The dish @ 1 day:
After the yeast grew, I contacted Professor Duffy & he let me use his microscope to take pictures of my plate.

The microscope is fitted with different light filters, to allow visualization of GFP (green) , BFP (blue), and mCHERRY (red). I took my sample, placed it under the microscope, and turned on the GFP filter (UV/395nm wavelength).
This was the result:
The glowing portion is a GFP cell cluster that grew.
This picture was taken at 8X, so it is a portion of the plate. Also, the microscope camera was acting up, so I had to line my phone up to the ocular to take the picture,which is why the picture has a low resolution.
Optimization:
There are several optimizations I would like to do for my yeast art:
As for (1), I have also contacted Professor Farny; I heard from Professor Duffy that her IGEM team makes bacteria art on agar plates as well, and has a setup that will allow for full plate illumination. I will be able to do this on Friday.
I am also going to try exposing my plates to simple LEDs of the correct wavelengths, to see if this is an effective means of art visualization. If that works, I may be able to bring my art to class.

Simple LED setup I rigged with a basic stamp
*I will also purchase a UV (395nm) flashlight to visualize the GFP.

This is an image I took with my LED setup. I currently am waiting for a UV LED to get delivered to illuminate the GFP, but the effect produced with the backlit red LED is still visually interesting.
I have also made progress with my UV long-exposure setup:

This is a UV sterilizing light-bulb, placed in a simple desk lamp, underneath a protective box. Yesterday, when the parts came in, I made a plate of GFP yeast, and exposed it to the light for about 5 hours. I am currently awaiting results.
Materials:
I have acquired most of the materials I need:
I still need these materials/accesses:
Milestones:
For my project, I will be focusing on using glowing florescent yeast and strains to make light art. I have access to Professor Young’s stocks of glowing microbes, so I will be making art, in petri dishes, at Gateway.
Logistics
The microbes produce various strains of florescent proteins. These proteins need to first absorb light to gain the energy they need to emit light. For example, a green florescent protein, or GFP, needs to receive light at an approximately 383 nm wavelength, which is blue-ultraviolet light. In return, GFP will emit a strong green light, at about 509 nm. Because of this, I will need either the correct-colored LEDs, or white LEDs and the appropriate spectra filters to make my art visible.
I have a few ideas that I would like to try out to make light art:
Painting
This is the least intensive method for making light art:
I would like to see if I can make a time-lapse video of the microbe growth.
Here are some examples of microbe painting from Pinterest:


Photonegatives
This technique requires a little bit more of a setup from painting.
Result are visually stunning though! (This example is also from Pinterest):

I made a first-pass attempt at this kind of artwork using yeast cells in the lab last week- I definitely need to optimize the process.


I believe this happened because yeast cells are much more robust than the bacteria cells that other artists have used. I am going to try this method with bacteria if I can- they die much easier with UV exposure.
I am also going to buy a UV sterilizing light & expose the yeast to it overnight to see if that works…

3D Printing & Sculpture
If I have time, I would like to try to 3D print non-circular petri dishes to grow my cells in. In addition, I have an Idea to make a 3D petri dish lamp using an LED as a light source for the yeast grown in the petri dishes.

(Glowing cell culture disco ball???)
The lamp will be a small and roughly circular ball formed from petri dishes attached together. In the middle will be a blue LED; this LED will be the proper wavelength to make the yeast in the ptri dishes glow green. As a result, the lamp will appear dimly yellow from the agar, with glowing green patches where the yeast are, and the natural blue from the LED will shine through the gaps in-between the petri dishes.
Please feel free to reach out to me if you have any suggestions or other ideas!
For my presentation I got to focus on the artist Janne Parviainen and his fantastic light paintings.
Artist Background
Janne was born in 1980 in Finland, earned his degree in photography and painting in 2003 from the Finnish Hyvinkää Art School, and has been teaching art and freelancing ever since. His works have been featured in several international art exhibitions, magazines, and well-known websites, including National Geographic, The Huffington Post, and Wired.

(This photo was in UNESCO’s Year of Light Exhibition in 2015) Catharsis means to release strong emotions through meditation, which is apt for this image.
Light Painting Methods
Like the photo above, most of Janne’s light art features surreal beings made of pure light, inside of abandoned buildings, drawn backgrounds, or among the dark woods surrounding Janne’s native Helsinki (Finland). When one looks at the images, it is hard to believe that they are produced with only a long exposure camera and some simple LEDs.
Yes, indeed, they are only photos- and not the Photoshopped kind!
The video below shows the process Janne uses to create some of his light painting- note how fast his drawing hand moves. (The best content is from 2:17-3:17 in the video)
Art Themes
Janne’s art usually has a spiritual or abstract theme, which compliments the otherworldly beings that Janne conjures with only light. (The figures themselves are usually either contoured light beings or skeletons). Some of his works also feature the telling of an object or scene’s past with light art, and are set among abandoned buildings in Helsinki and other places of urban decay. Janne also enjoys manipulating perspective in his photos by drawing landscapes surreal enough to match his figures with reflective marker in his studio.
Examples of Janne’s Light Paint Photography:
The Time is Now– This piece centers around the theme of procrastination and contemplation on whether a task is worth the effort

We are all Refugees– This work is also a political statement (Janne is socialist). Note the use of forced perspective with the reflective drawing Janne made on the floor of his studio.

I Can Still See You– This has a spiritual theme: The dead are watching us

Roads That Lead To Nowhere– This piece brings the rusting van’s wild past to light with light painting

In the years to come, Janne will continue to stretch the limits of photography and our imaginations with his work.
Hello all,
Welcome to D term! My name is Allie, I am a senior studying chemical engineering, and I am excited to be making art this term! Previously, I have worked with mostly sketching, some Photoshop, and have made a few sculptures. The style of art I am most familiar with pen sketching; I like to freehand a sketch with only a rough idea of what I am drawing, and let the drawing evolve on the paper as I sketch it.


I also have some Photoshopping experience:


I am particularly proud of of a big metal pterodactyl sculpture that I created a while back. This took a very long time to make (I had to weld metal parts together to make it, which needed supervision). I almost stopped halfway through because I needed to find access to a welder- but I am very glad I didn’t and the sculpture now hangs in front of one of my windows.


I am taking this light art practicum to mix it up a bit- I am also an undergraduate researcher in Professor Young’s lab. He works with several strains of luminescent yeast, and has allowed me to use them to create living, glowing art.
I have always drawn heavily on organic forms when I create artwork. My pet birds and fish often lend themselves as inspiration, along with reptiles and dragons from mythology books I read as a child. Since I became a researcher, I also became fascinated with the growth forms that microbes assume. Often, when you look under a microscope you feel like you are looking at art. I would like to convey the sense that the barriers between biotechnology and art are only perceived.
In addition, I like to layer my drawings, so that you have to look a few times to see everything (i.e. the eye of a bird is also the eye of another bird, the beak of one may be the tail of another, etc.). I am looking forward to the challenge of applying these concepts with glowing yeast.
I am excited to see what we all come up with. Let’s make art!