At the start of this week, there was one main hurdle left to overcome before having a working version of my project. Earlier versions used very simple code that would just cycle through LEDs to show that the wiring works. This week, it was time to write the code for actually simulating the neurons, in order to create a functional version of the art piece. In addition, I set out to replace the temporary breadboard I used last week

with a more permanent protoboard that could be soldered to, like this:

Since my wiring from last week was already functional, I began by transferring that to the protoboard and soldering it in place. At this step, I also had to add a second shift register in order to control all 14 LEDs currently present.

The wiring is now much more self-contained and less likely to fall apart (since it’s soldered). However, since this protoboard is almost completely taken up by the two shift registers, an additional board will be necessary to connect the top half of the model.
With the wiring in place, it was time to start writing the code. In creating the functionality of the project, I wanted to mimic the actual behavior of neurons as closely as possible.

Most neurons have a cell body that stores charge, as well as several synapses which send signals to other neurons. These synapses are the ‘connections’ that I am simulating in this model. When one neuron activates, it sends a signal to all neighboring neurons via the synapses. However, these synapses aren’t bidirectional, so a neuron won’t send signals to the same neurons it receives them from.
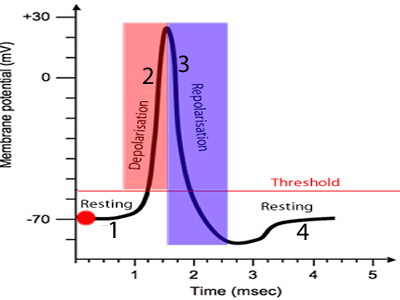
When the neuron actually sends a signal is determined by its charge. Each signal received by the neuron alters its charge by a small amount, and when the charge passes a threshold, the neuron fires its own signal. After the signal, the charge dips back below it’s resting value, and begins to slowly return.
In the software for this project, I have simulated these features of neurons. Each LED is represented by a node that keeps track of its current ‘charge’, its threshold for sending a signal, and which other nodes it has synapses to. To simplify things, I just have the charge start at zero, and activate the LED after reaching a certain positive threshold. It then becomes negative and slowly decays back to zero. After the LED turns on, a node will wait a short amount of time before signaling its neighbors, so that the signals can be easily visualized, and to simulate the time it takes for a signal to propagate.
Here is the result:
In this video, you can see that the behavior is more interesting than simply looping through the LEDS. However, since the top half is still not added, and the bottom half just has two rings of LEDS, the signals can really only travel in one dimension. Clearly, the next step for me is to print out and wire the top half of the model. I wanted to make sure the bottom half was finished in a permanent state before doing this, so that I could be sure that everything will work. Because of this, I think the top half should be much easier to finish than the bottom half, and I expect to have the entire model functioning by next week.