Below is a video of the final version of my project:
Light Art Practicum at Worcester Polytechnic Institute
Below is a video of the final version of my project:
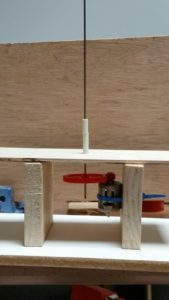
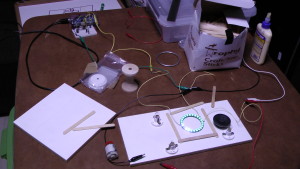
For the last week of the project, I built a structure out of craft sticks and a thin plank of wood. The structure extends up above the cylinder to hold the upper end of the axle, which passes up through the center of the cylinder, in place. I then built a circuit to enable an Arduino to control the RGB LED ring and the motor.
Below is a picture of the structure that I built around the cylinder:

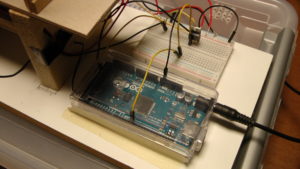
Here is a picture of the circuit that I put together to power and control the LEDs and the motor using an Arduino and a 5V power supply:
I wrote a program that executes on the Arduino to control the LEDs and the motor. The LEDs are initialized to random colors. Over time, the color pattern rotates around the ring and the colors tend to change over time. The motor changes speed randomly. At the end of every random time interval, a random target speed is selected, and the motor’s current speed drifts towards the new target speed.
Since the last update, I have made significant progress. I have assembled a frame to hold the motor and axle in place. Below is a picture of this:
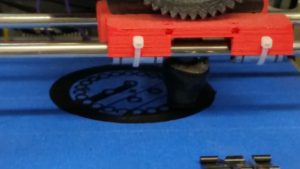
The following picture shows the assembled cylinder, and gears at the bottom of the image. The wooden pieces firmly hold the gears, which have a 1 to 5 ratio, together. The gears will enable the motor to spin the axle to rotate the cylinder. The cylinder consists of the 3D printed discs, 24 cut acrylic rods, and nails to hold the rods in place in the upper disc. The tape around the upper disc will temporarily hold in the nails.
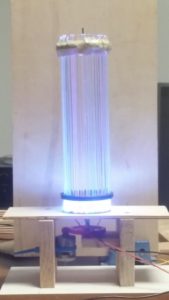
Below is a close up picture of the LED ring and the rods extending out from it while it is emitting light.

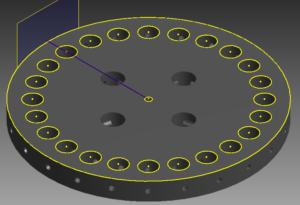
In the past week, I have fabricated and designed a few parts of the project. Above the 24 RGB LED ring will be 24 acrylic rods. Each rod will extend upwards from an LED. The rods will be held in place by 2 discs each with 24 rod holes and 24 pin holes.
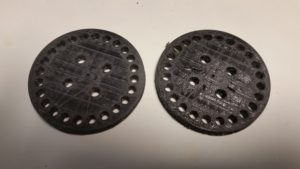
I used Autodesk Inventor to design the discs and then 3D printed them. Below are images of the design on the computer and the discs during and after printing:
![]()
![]() In addition to the discs, I started designing a way to produce interesting lighting effects on the LED ring. I thought of a mathematical software model where each LED is backed with a block that can send information to and receive information from the adjacent LED blocks. Each block will have an internal state that is converted to LED output and all 24 blocks will update periodically. I believe that because this a very general technique rather than a list of preprogrammed explicit patterns, it will produce interesting and unexpected lighting effects.
In addition to the discs, I started designing a way to produce interesting lighting effects on the LED ring. I thought of a mathematical software model where each LED is backed with a block that can send information to and receive information from the adjacent LED blocks. Each block will have an internal state that is converted to LED output and all 24 blocks will update periodically. I believe that because this a very general technique rather than a list of preprogrammed explicit patterns, it will produce interesting and unexpected lighting effects.
In the past week, I bought the most important part that I will use in my project. This is the RGB LED light ring. I soldered wires to the ring and tested it. Below are two images of the setup. I connected the ring to a 5 volt power supply in the top right of the upper photograph. I also connected the ring to the Arduino in top left of the upper photograph.

For my project, I would like to have a rotating piece in the middle of the ring with parts on it that interact with the light. After thinking about many possibilities, I have decided to use 24 acrylic rods. Each rod will be mounted to a piece in the middle of the ring that will hold it directly above an LED on the ring. The 24 rods will be able to rotate around the ring.
These are the items that I need to buy before I can move forward with the project:
To develop an idea for my project, I began by thinking of many small ideas as potential requirements for my final project idea. Some of these ideas were to build a sculpture that would use math to produce changing light patterns, to control light based on music, include a motor to make the sculpture kinetic, to use water or some other fluid in the project, and to use a ball bearing to reflect light.
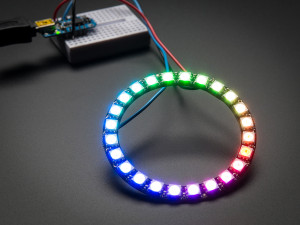
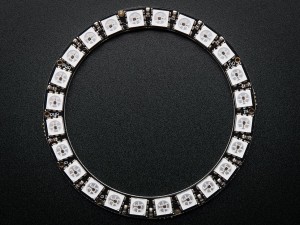
I started feeling inspired after thinking of the idea to base my project around a certain LED part. The part is a 24 RGB LED NeoPixel Light Ring, which Adafruit sells. Images of the ring are below, and it can be found at https://www.adafruit.com/products/1586.
The first idea that I thought of was to mount refractors around the ring to refract the light onto a single point that is a certain height above the center of the ring. Below is a diagram of the idea.
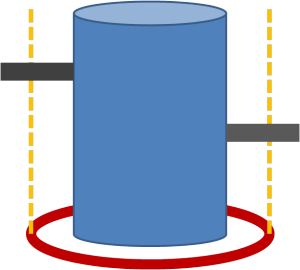
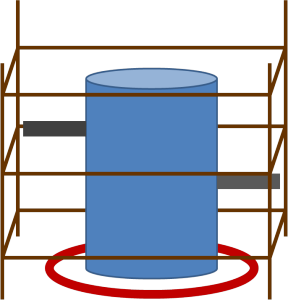
I later though of a more complicated idea. My second idea called “Rotating Tower” is to place a cylinder that extends upwards from the center of the light ring. A motor would be used to rotate the cylinder. The cylinder would have parts extending out from it that would interact with the light, which is projected upwards around the cylinder from the ring. I then thought of the idea of building a structure around the cylinder. Here are diagrams of the idea with and without the structure:
Finally, I thought of several additional ideas, which are not fully developed yet. Here are the additional ideas:
The light artist Paul Friedlander was born in 1951 (http://www.paulfriedlander.com/text/CV%20update%20November%202013.htm) and grew up in Manchester and Cambridge England. He was very interested in the sciences from a young age and studied mathematics and physics at Sussex University. He later studied Fine Art at Exeter College of Art and become the lighting director for a few theatre productions.
Friedlander’s artwork is inspired by movement and machinery, and a show called “Kinetics” that he saw at Hayward Gallery in 1970 inspired him to dedicate his life to kinetic art (http://www.paulfriedlander.com/text/memyself.htm).
One of Friedlander’s early pieces were chromastrobic light sculptures. The sculptures were built using black and white designs and electric motors to spin them. The sculptures used the concept of chromastrobic light, which is Friedlander’s discovery that changing light faster than the eye records images can produce remarkable visual effects. The images below show these sculptures.
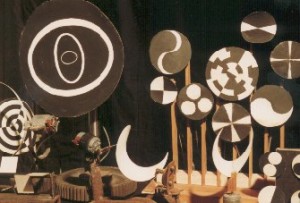

Source: http://www.paulfriedlander.com/text/artbackgnd2.html
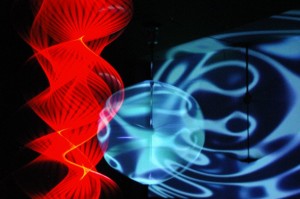
Later, Paul Friedlander started to use an original technique to produce 3D, changing visual effects. The technique was to vibrate string very quickly and project colors onto it. One of his pieces was called “Dark Matter”, which had the goal of showing what dark matter would look like if it were visible. The exhibition was 8 meters tall and was interactive. Below is an image of this project.
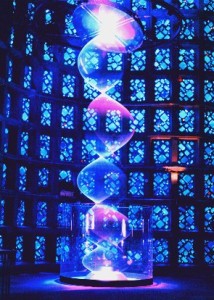
Source: http://www.paulfriedlander.com/text/guardian.html
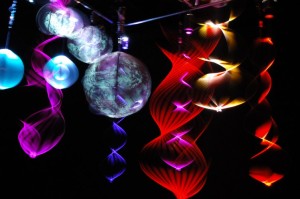
Another piece that Friedlander exhibited is called “Timeless Universe”. After obtaining content such as ancient scripts and mathematical formulas that describe the universe, he produced a 15 piece exhibit with changing imagery that shows many variations on the theme. Below is an image of this exhibit.
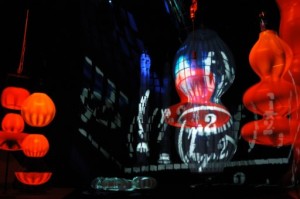
Source: http://www.paulfriedlander.com/text/sala2006.htm
Below are some other images of Friedlander’s work.
Source: http://www.paulfriedlander.com/text/singapore.htm
Source: http://www.paulfriedlander.com/text/Canarias2004/installation-2.htm
Source: http://www.paulfriedlander.com/text/spain2004_0021.htm
My name is Alex Wald, and I am currently a Junior. My major is Computer Science, and I am also pursuing a minor in Electrical and Computer Engineering. In my free time, I enjoy developing software and building electromechanical projects. In art, I have experience with ceramics and photography and some experience with digital art.
While in high school, I participated in a wheel throwing class every Saturday for three years. In the class, I made ceramic pots, bowls, and cups. Below is a picture of one of my pieces.

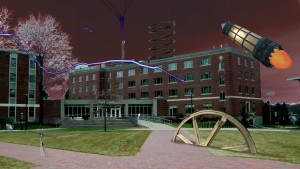
At WPI, I have taken the art courses Essentials of Art, Digital Imaging and Computer Art, and The Art of Animation I. One of my favorite projects in these classes was in Digital Imaging and Computer Art and was to make a surreal scene using images and Photoshop. Below is the image that I produced. I also enjoy photography so I decided to take pictures for this project and use pictures that I had previously taken to produce the image below. The title of my surreal scene is “Technological Invasion”.
My interest in Computer Science began when I was 10 years old. I have written programs in many languages such as C, C++, Java, and AutoHotkey Script. In the past I have done web development with HTML, CSS, and JavaScript. I have also developed for Android, Arduino, Raspberry Pi, and Lego Mindstorms NXT platforms. I started learning about basic electronics in high school, and now I am learning more advanced topics such as digital system design with FPGAs and signal processing. I have done work using Verilog, a hardware description language, and MATLAB.
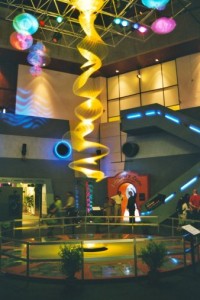
Recently, I have been inspired by art that combines technology and creativity for entertainment. One of my personal projects is called the Gadget Room. The Gadget Room is a project that combines my artistic and technical abilities, and the goal of the project was to add entertainment to a room using lighting and mechanical devices. During my Sophomore year, I had the project set up in the common room of my suite in Founders Hall. Below is a video of the project.
In the Light Art Practicum, I look forward to the opportunity to work on another project that consists of both art and technology.