Printing. Will take 6 hours.
The legs are really boring because they have to be the basement of this sculpt in order to make it stand up.(hopefully)

A low quality 3D model
Expectation:

Light Art Practicum at Worcester Polytechnic Institute
Printing. Will take 6 hours.
The legs are really boring because they have to be the basement of this sculpt in order to make it stand up.(hopefully)
A low quality 3D model
Expectation:
I may have slightly overestimated how long I am actually able to sit and paint for in one sitting, especially since I usually paint bent over on my floor and it’s just not a good posture to hold in general. But, I did get about 2/3 of the way through the back painting for my project, and even added some of the glow paint into the upper parts of the painting. The bottom part is going to take some work to get the light source right, so that’s what I’ll be working on in the upcoming week. I am also thinking about ordering a frame, but I’ll need to be careful to make sure that it doesn’t have any glass or plastic in it that would diffuse the pigment light, which is very obvious in a dark room but dim enough that it would be easily lost if it were diffused. Mixing the pigments with a very high pigment to binder ratio seems to be working, but my phone camera is still bad. My plan is to rent out a better camera for the final project. (Fingers crossed that I remember and am able to get a hold of one.)
There still a fair amount of glow paint left to add (I haven’t done the orange or the red yet which makes up the bulk of the teddy bear), so the painting still doesn’t really look right in the dark, but it’s getting there.


I’ve made some good progress since last week. I’ve mostly developed two areas of my project.
The first area is that I’ve improved the precision of the light blips a bit to more accurately correspond with the actual notes or sounds they’re supposed to. Before I had some issues with noise causing some of the blips to light up when they shouldn’t, so I’ve made the spectrogram a bit smoother and I’m able to track certain notes now a bit better.
The other area is that I’ve finally come up with a plan for the enclosure for the LED matrix. I’ve ordered some translucent acrylic plastic sheets, and the idea is to cut them and glue them together to make a nice flat diffuse surface for the light to come through. A sheet of acrylic will be mounted over the LEDs so that the glare you get should be reduced significantly. I tried diffusing the light using just some paper napkins, and it looks a lot better. You can’t even make out the individual LEDs any more, they blend together into really nice looking blobs of light. Hopefully the acrylic will provide the same effect, but be more permanent.
Sorry I don’t have any images or videos or anything for this week, but there isn’t much visual difference from last week, and I’m getting fed up using my phone camera. Next week once I have the final product done, I’m going to use some actual good camera equipment in a nice dark room to record the display, and I’ll use some actual video editing software to put the audio on it. Looking forward to seeing how it turns out!
My first suitcase is done!
I have finally finished the carving of the travel suitcase. I think it turned out well and I am trying to figure out if I want to add something on the top of it, but I kind of liked the way it looked and don’t want to make it cluttered. If I was going to add anything, it would be a skyline or pyramids or something that is longer horizontally and shorter vertically.
I got a second suitcase and I figured out how I want to incorporate the theme of long distance relationships into it. It is kind of hard to explain, but I will have two different “collages” on each side of the suitcase that show how each persons’ story is different but similar. The middle will be a heart cut out with a head of a man on one side and a head of a women on the other side. When you look straight on to the suitcase, the two heads will come together to interact within the heart. I want to do this for the other images on the suitcase and have them relate to each other but tell a different story.
I am excited about being able to have two dimensions for shadow and using both sides of the suitcase. I will be a very fine way of carving and needs to be exact, but I think I can do it!
Here is the picture of the light coming through my finalized suitcase (unless I add more….) Also the pictures are so hard to make it look as good as it does in person. 
Sorry I missed a week. Honestly, I had a really busy week last week and didn’t get the chance to throw something up here about my progress.
That being said, we’re reaching the end of this project, so it’s time to kick it into high gear.
Current Goal:
So I’m making a set of “Flattened” 3D Models that I can use to make cutouts on the faces of a box (which I’ll 3D print). Light will enter the box and fill the negative space of the cutout and create the shape.
Potential Problems:
I’ve never 3D printed before so I’m still not sure how it works. I’ll have to play with it a bunch this weekend to make everything work (I’d like to talk to you about this if possible Professor Rosenstock).
Also! There’s the fun fact that certain surfaces don’t reflect light as well as others, so in order to account for this, I want to have the inner network of holes to be made of a reflective material, which could be difficult in terms of 3D printing. So yeah, this’ll be an eventful weekend.
Actual progress shots:
I have a couple of screencaps of the 3D models I’ve made and what shadows they make (which are the same as the images they’ll craft in the negative space).


Feedback is welcome! I now know that I don’t get e-mails when people comment on things this time, so if I don’t respond to your comment, chances are I didn’t read it and you should let me know it exists (y)
Thank you friends!
Hey everyone,
Last week I got my RBG led working with my setup and force sensor to change color based on force. Currently its setup so that there is a color for LIGHT, MEDIUM, and HEAVY weight (with respect to what the sensor is able to detect). These colors are RED, PURPLE, and BLUE respectively. I also began assembling the structure of the base, and the single platform. While constructing, I had some thoughts and I might have another part of the structure instead of the platform light up instead of the platform itself. At the moment I am a roof like structure for where the light will be (will describe more with the pictures). So because of the work I still have to do properly hiding wires as best as possibly while creating an interesting enough structure, I am going to stick with this single platform with one light changing. Two more platforms would have more wiring to try to hide/organize and result in a less interesting/nice piece with the time I have left.
Here are the pictures of the structure/setup I currently have (under light, so light does not show as well but I have video for light in the dark):

LIGHT PRESSURE

NO PRESSURE – NO LIGHT

MEDIUM PRESSURE

HEAVY PRESSURE (as you can see platform is quite small, I will probably try to make it wider/bigger so I can place/fit more interesting objects on it)
And here is the video of the light in proper darkness!
For this week: I will complete the structure, hiding the most wire/internal bits as possible. Any suggestions/comments are welcome and appreciated!
I’m behind on posts!!! (Noo!!)
Progress has been slow but steady with the web of things! A little behind than I hope I would be.
The Raspberry Pi Zero arrived 1.5 weeks ago and it got setup.

Downside to a small form factor– not enough ports! Thank goodness for USB hubs.
I tried to see if I could setup a remote access into the Pi but unfortunately, it was not possible… Next step: Having a one-way communication with the FLORA board.
In addition to the Pi– I have started on assembling together the off-brand NeoPixels! At first I soldered a few together to test them out…


Attached them to the FLORA board and ran a strand test from the NeoPixel library. They work! Hoorah!
Next up is to add more to them!

Only the first four managed to light– which probably mean I soldered a connection to the LED poorly. Since I wasn’t able to solder at the moment at which this picture was taken, I decided to write up a test sketch that made a random LED blink a random color.
Eventually, the Pi will be sending a command to the FLORA on how many will light up– and this sketch will play a part in it. I’ll also be going back to the ECE lab fixing up connections and soldering up the remainder of the strips.
As for the structure, the string web has been scrapped for a more sturdier structure made of galvanized steel– salvaged from my cosplay prop days.

It probably isn’t super apparent in the image shown, but it’s shaped much like an umbrella, and will either have string or wire hang from the steel wire.
Hello!
I have finally been able to work on some more carving of the suitcase- I have drawn on the final image that I wanted to have on the suitcase and I am almost done carving it. It has become a balance between finding time to carve while also waiting for the tool to charge. I could have a solid hour to work on the suitcase, but in about 20 minute the tool will die and I will have to wait a little while before I can use it again.
I have also invested in some face masks that people wear when they’re sick as too prevent inhaling any smoke. It gets pretty smokey and I still haven’t figured out if there is a way that I can stop the smoking because sometimes it is a lot smokier than other times. I also found that lighting a candle during the carving will help with the smell. I’ve come to find the smell of burning suitcase to be something I am not a huge fan of.
Here is a picture of what I have so far- the picture that is dark doesn’t have all the carving done that is done now. The picture of the suitcase with the lights on is what has been done so far. My plan for the next week is to buy another suitcase and put together a plan for that suitcase.


I hope to have two or three pieces done for the end of this project.
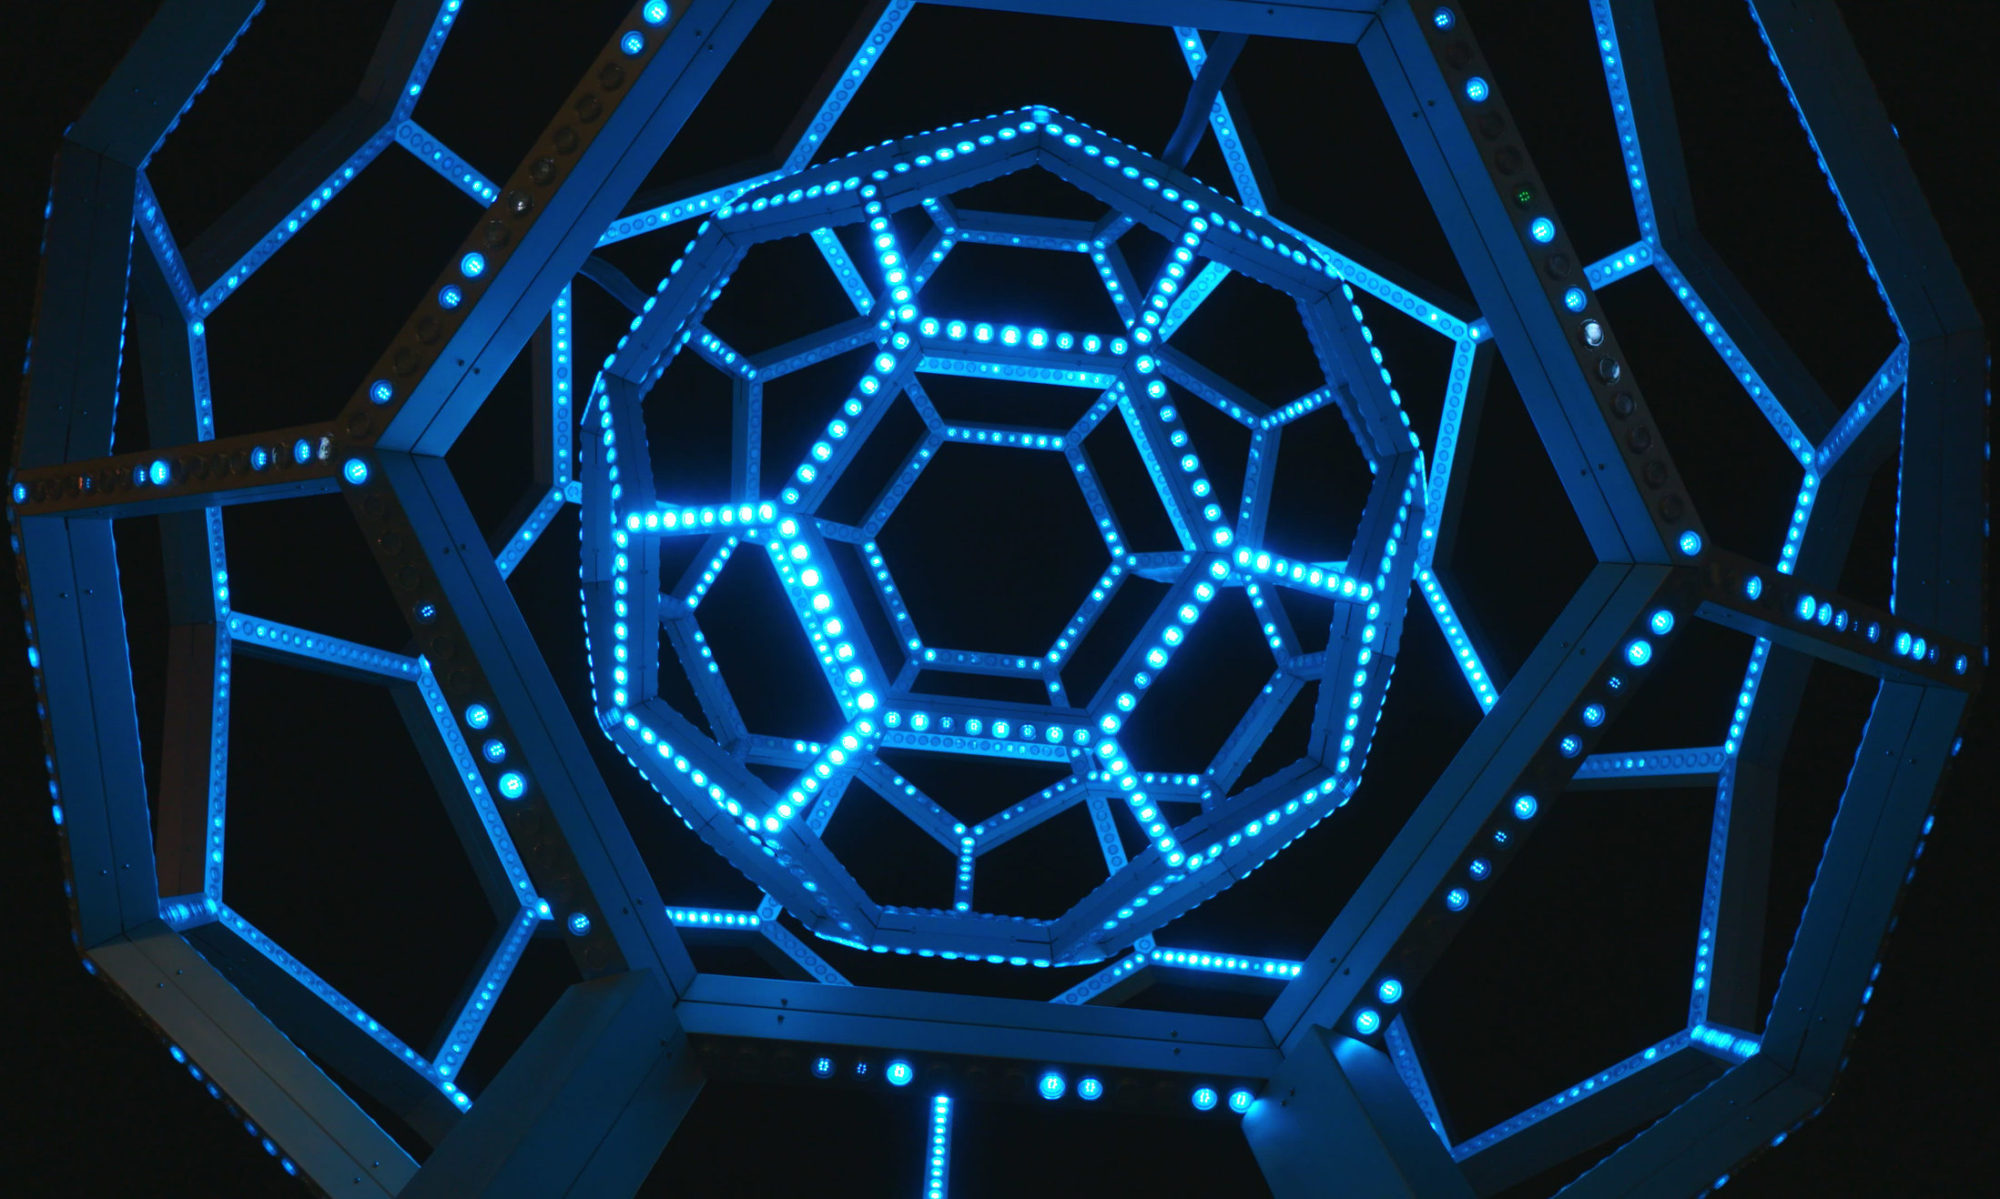
My project has come a long way in only a couple weeks. For starters, I’ve switched from using the LED strip to an LED matrix:

This has opened up so many more possibilities in terms of how I can display the visualization. My current design uses circular “blips” that increase and decrease in intensity to the beat and move around the matrix. It works pretty well. I’ve also managed to get the signal processing to be much more accurate, so now I can pick out individual notes and instruments with some degree of accuracy. This means that certain properties of the visualization, like the intensity of a blip or the rotation of the image can be easily mapped to the current volume of a note or the energy of an instrument. This mapping is manual, so I’ve decided to only make my visualization work for a specific song.
Here’s my very poorly recorded demo of what I have so far. Again, you can’t actually hear the song in the video, so I had to use YouTube Doubler again. You might have to refresh a few times to get the videos to sync up. I really need to get some kind of video editor…
Right now the visualization only runs for the first part of the song, but extending it to map to other parts of the song shouldn’t be too much work. I guess my to-do list right now includes:
Since last week, I’ve finalized the positions of where I want to place the LEDs. I’ve also decided against El Wire for the time being and I’m going to focus on Neopixel strips and rings.

I’ve also gotten more guitar parts than I have LED parts so far. Note the black tuning pegs and bridge.
Tomorrow I’ll be laser cutting the new pickguard out of clear acrylic. I have an outline traced in CAD already, so fitment after the cutting should be the only obstacle. A friend also suggested I can etch/sand a pattern into the acrylic to make an image, which I’ll be testing as well.
As soon as I get the Arduino, I have a lot of setup and programming to experiment with, so hopefully I’ll have a decent rig by next class.