Web of Things Final & Post-Post-Mortem

Last stretch!

Went to the ECE Lab today to fix up the broken LED strips. Once they were fixed, I added the strips to the structure and wired it up to the FLORA board. Since the structure was beginning to give and bend due to the weight of the LEDs, I added two rings of galvanized steel for additional support. Bent them a bit to make it look more natural and “loose”. This works out since the structure looks more web-like.


The web fully lit up!

Once this was done, I attached the Raspberry Pi to the structure and hooked it up to the FLORA.


Green and ready to go!

The structure felt unexciting with LEDs occasionally turning on and off, so I decided to decorate the web with some fiber optic threads. I clipped several 6in-1ft strands, bent them at random points along each one, and attached them to the NeoPixel LEDs. Not only did it light up in the middle of each strand, but the randomness made the web look more chaotic.

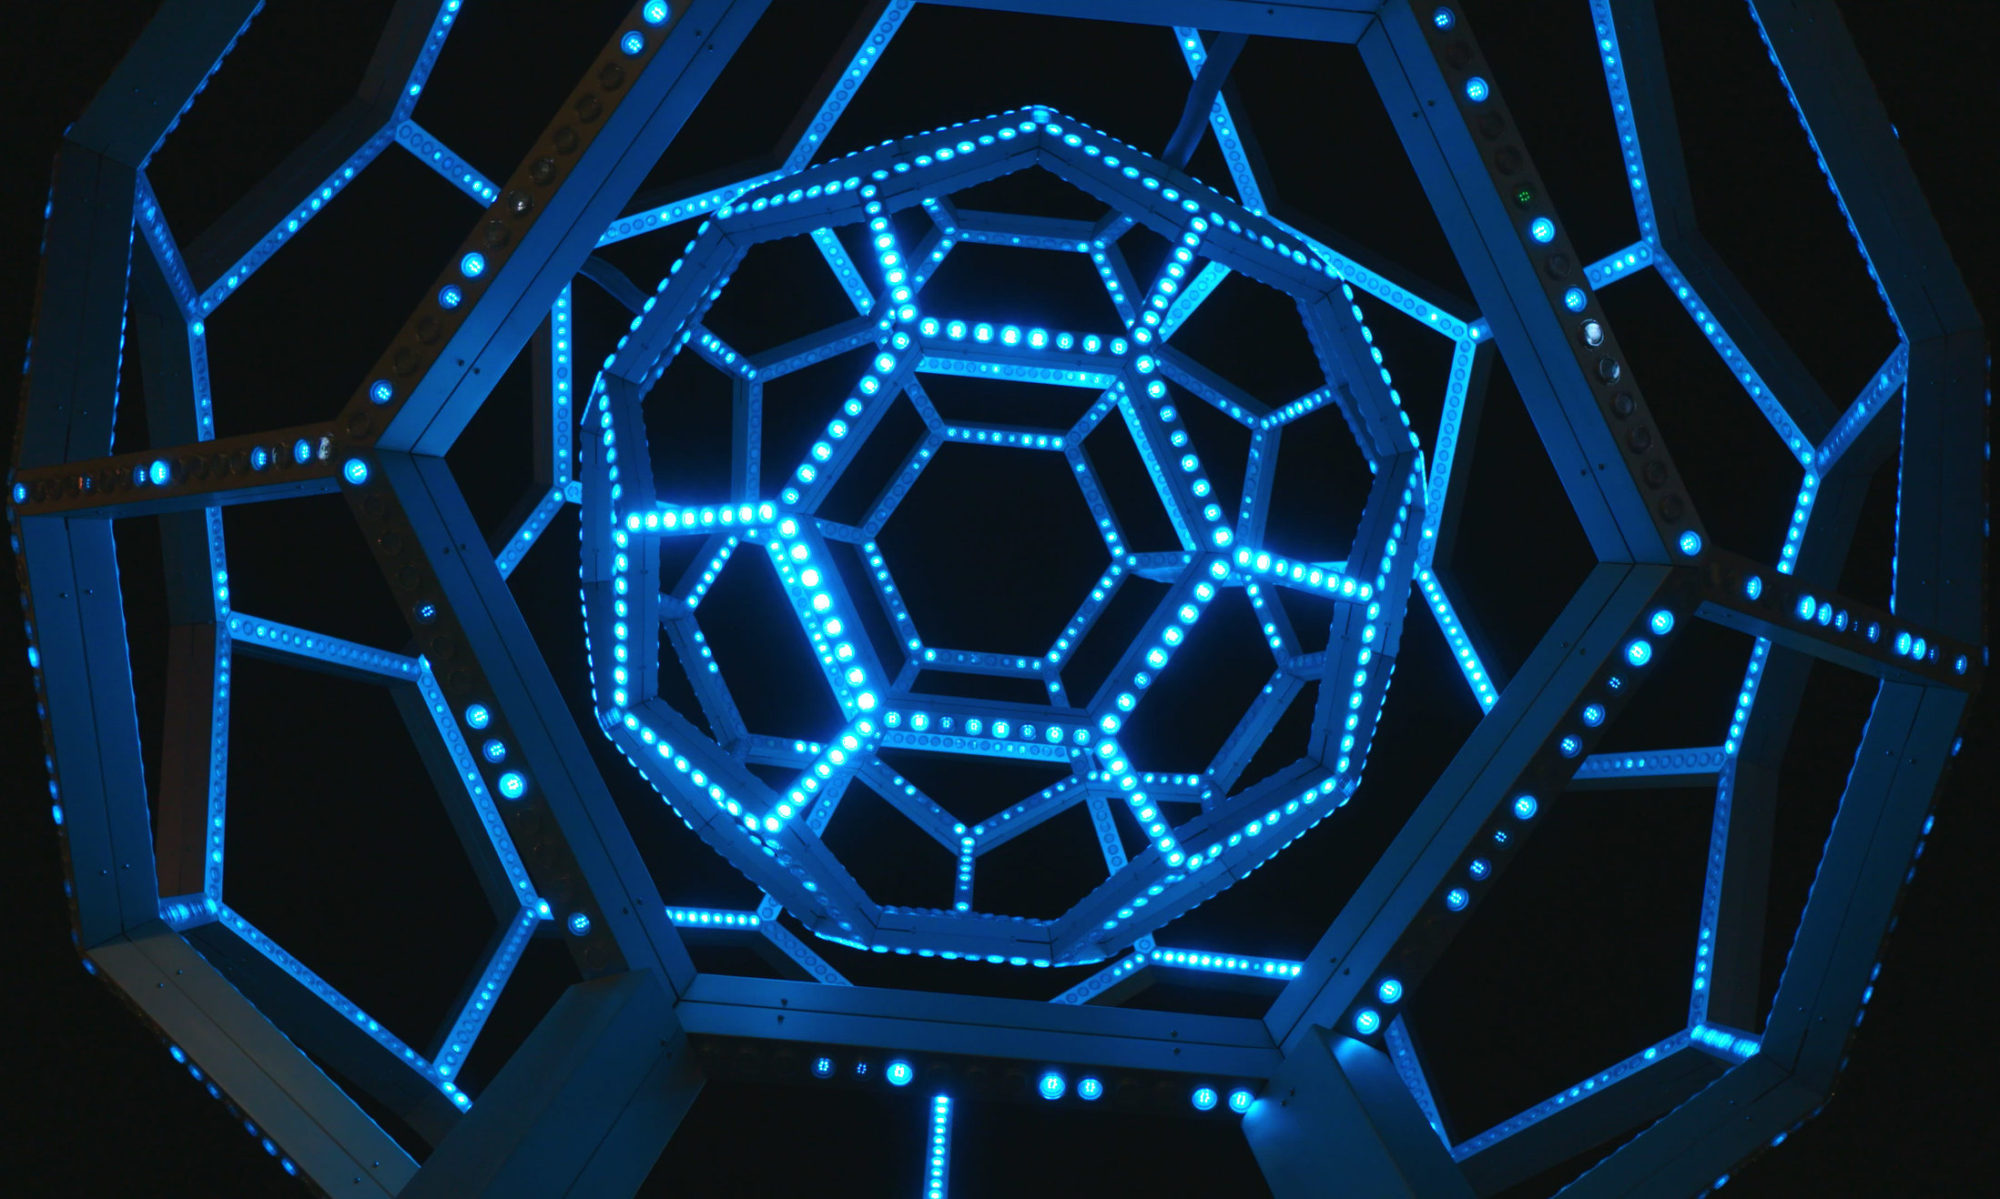
The end result. The LEDs ended up radiating from outside to inside, rather than inside to outside. I think I like it this way anyways. It’s kind of like looking at towns from a plane vs cities from a plane. Towns have one or two bright lights with a few brightly lit roads. They’re spread out and buildings can appear distinct from each other. Cities have more lights and more networks of lit roads. They’re also more compact and buildings are harder to differentiate.

With the code that the FLORA board is running, the structure also spirals inwards which looks super neat.

It also looks more like a neural structure than it does a spider web but I think the message of “everything is connected to each other” still stands in this visual context.

Video of the structure in action (in various phases). Apologies for the lack of quality.


Web of Things structure in the light.

Post-Post-Mortem

I think my original plan/idea was out of scope given the time I had to actually work on this project. (I didn’t get to implement the spider… )^: ) GDC was a huge deterrent in my ability to complete this on time. If I were to do this again, I would have also made my shopping list as soon as I could because some took until the middle of the term to arrive. I would have also bought prebuilt NeoPixel strips instead of individual ones. Assembling the strips and debugging ended up taking up the most time that could have been better used elsewhere– such as better lighting effects, and detecting wireless devices besides access points. Despite all of the bumps in the road, I’m pretty happy with what I have currently. The fiber optic threads really hits it home in terms of aesthetics. I’m definitely happy to have this live in a public space such as my living room.

Practicum Take 3 Post Mortem

So, after some issues with how lasers work and my inability to get them to co-operate, I changed my project yet again!

I essentially decided to shift my attention towards making this a light-refracting aesthetics project. I couldn’t come up with a clever name for this one, so I’m just going to refer to it as “Twine,” because I used an inordinate amount of twine in the process of making this.

Materials:
– Twine
– A Dowel
– A bunch of 1 inch mirror squares
– Hot Glue
– 8 LED votive/candle things
– A dark sheet
– Masking Tape
– A flashlight.

The Project:

And with the lights off:

Aesthetically, I was going for a sort of ethereal, dream-like setup, with maybe a little bit of black magic ;-).
The candles help to set the mood, through their flickering and general aesthetic lighting:

The mirrors throughout the background almost resemble stars in terms of how they’re hung and the appearance they give off when they reflect light.

But the real magic is what happens to the rest of the room when you shine a light on the display:

The room becomes filled with these astounding quadrilateral lights that just add to the dream-like atmosphere.

Experimentations:
I tried to add to the scene in various ways, such as by adding fog or adding additional light sources.

I don’t have a picture of it, but when I added the fog, it did improve the general feel of the scene to be much more dream-like, but it wound up blocking the light too much and removing a lot of the reflections.

The other thing that I tried was adding in some Christmas lights, in hopes of getting some additional bounces off the mirrors.

Sadly, these just obstructed the flash light and, much like the fog, made it impossible to see any of the light reflections from the mirrors.

Conclusion:
All in all, I truly wish I could have done something much more intricate for this project, but after two failed attempts I figured I needed to really dial it back if I wanted to complete something functional.

Post any questions, comments, or concerns below.

Web of Things Semi-Final

Post-mortem link from last week here.

Since returning from a week-long conference trip, I have made additional progress to improve upon the half-working Web of Things light structure.

Things that were working last week:

  • 1/2 of the LED strips
  • Searching for access points within the area

Things that weren’t working last week:

  • Searching for wireless devices (phones, laptops, etc.) within the area
  • The other 1/2 of the LED strips. A connection broke in one of the LEDs.
  • Getting the Arduino & Raspberry Pi connected
  • Polish and structure stability in general

First, I determined whether or not detection of mobile devices was even possible with the wireless dongle that I had.  I installed the following programs that are specifically meant to grab information the wifi dongle sees:

After following several tutorials such as this one, these programs have returned just wireless access points on the Pi. Despite being advertised as a wireless dongle that has such capabilities, it’s possible that the hardware had limitations with what it could see.


Pi running airmon-ng. It sees some access points and a printer.


Pi running Kismet. Same thing as airmon-ng.

The Pi was able to consistently and accurately detect around 10-20 access points within the area and I decided that would be a decent range of points to display on the web. Instead of digging further, I moved onto hooking up the structure.

This is the code (as of 3/6/17) uploaded to the FLORA board. It listens for input from the Raspberry Pi via I2C and lights up the LEDs starting from the center of the web. Since only half of the NeoPixel strips were working, I had to make it work with just those strips.

Here is the code for the Raspberry Pi. It uses the wireless dongle and iwlist to scan for nearby wireless access points. Because iwlist doesn’t run on elevated privileges unless the Pi is already as superuser/admin, I had to take a snippet of the source and modify it (iwlist is under BSD license).

Video results of the combination above:

Video is sped up 3x. The structure is bouncing between 14 and 16 access points seen.

Now that both pieces work when connected, I had to make sure things still ran while un-tethered to a keyboard and monitor. I used forever & forever-service so that my wireless scanning script A) will run forever as long as the Pi is on and B) will run when the Pi is turned on. It was difficult to configure since I had an older version of nodejs installed, which confused forever on which version of nodejs to use when it was trying to run my script. Now the Pi is ready to be implemented within the structure.

Tomorrow will be a trip to the ECE Lab, where I will be attempting to fix the other half of the structure and hopefully polishing up the entire project.

Posting reference links I have used:

  • https://oscarliang.com/raspberry-pi-arduino-connected-i2c/
  • https://holisticsecurity.io/2016/02/02/everything-generates-data-capturing
  • wifi-anonymous-traffic-raspberrypi-wso2-part-i/
  • http://www.slidequest.com/q/70ang
  • https://stackoverflow.com/questions/13385029/automatically-start-forever-node-on-system-restart

Practicum Take 2: Ritual Beauty

So, for my second attempt to churn out a functional project, I’ve decided that I’d like to do something with lasers and, in doing so, salvage the 1 inch mirrors from my failed project.

Without further ado, I present: Ritual Beauty.

The premise of this project is to show that the standards that society and media set for beauty are so ridiculously impossible for people to reach. It’s almost like making a deal with the devil, or using witchcraft.

The lasers will take the form of the summoning circle, which while in typical witchcraft is a pentagram, will be a shape relatively similar to the human eye. In the center of that eye, will be a mirror. This will represent the pupil and show the viewer how the media is expecting them to look. Ideally, this would be a concave trick mirror, showing the viewer a thinned out version of themself. Since I probably will not have the time to obtain one of these, however, I may just have to settle for a flat mirror. Around the ritual circle will be some added illumination for the viewer’s face by way of electric candles (Or real candles depending on which is easier to obtain). These will represent the candles that you would typically find around the pentagram in a traditional summoning ritual and hopefully will not mess with the ability to view the lasers in the darkness.

Materials:
– 2 Laser Pointers
– About 50 1-inch mirror squares
– The Center Mirror
– 4 Candles (be they electric or real).

If you have any thoughts, comments, or concerns, please let me know!

Hayley Boigenzahn Glow Painting Final

This is a little late because I was procuring a camera that could actually pick up the glow paints in the dark, but I’m happy I waited because these photos are better than what I could get on my phone.

Final project in full light
Final Project in the dark

Overall, I think this project turned out fairly well. I came quite close to achieving the effect that I wanted, and it was a really interesting experience working with glow pigments. The project isn’t as neat and the teddy bear isn’t as well hidden in the light as I would have liked, but I think that if I continue to make paintings with the glowing pigments, I would get better at hiding where the glow pigments. It took me a while to really get the hang of the medium, and at that point I was already committed to a painting concept and a project that didn’t necessarily fit the colours as well as it could have.

I am happy that the teddy bear is identifiable as a teddy bear in the dark, which was something that was a concern for a while.  I also would like it if the glow paints were a bit brighter, but in general I am happy with how much they lit up after being exposed to good sunlight.

I’m looking forward to trying this kind of a project again sometime in the future — neater and better planned. One of my biggest mistakes was not realizing that I wasn’t capable to reproducing the flourescent orange colour of the glow pigment using my gouche paint, so it doesn’t blend into the spider’s face very well in the light. It blended better when it was all gouche paint, but after adding on thick layers of the glow paint to make it show up in the dark, it looked decidedly different. The colors in the gouche paint do not lend themselves to flourescent tones, so I would need to find another way to achieve that color using plain paint if I were to attempt something like this again.

Nevertheless, I like the way I was able to use ‘painted’ light and create two different pictures in different light, so I consider this project relatively successful.

LED Music Visualizer Final

EDIT: Fixed the images, sorry about that.

Here is a video of my final project result in action:

All the code for running the visualization can be found on GitHub.

It’s definitely hard to capture the full range and intensity of the light with digital photography (and I’m not an expert photographer at all), so just trust me when I say it looks much better and smoother in person.

I’m very pleased with my result though. I think the white acrylic enclosure had pretty much exactly the effect I wanted of diffusing the light and making it more into light blobs instead of piercing light points. The effect is much softer and more pleasing.

The acrylic enclosure turned out well.
My crappy cardboard stand for the display.

The animation, too, turned out pretty well. In the end I had to time some of the blips to the notes by hand, since I wasn’t able to use the spectrogram to directly map them to the blip intensities. The only ones I had to this for were the keyboard parts during the lyrics that show in the corners, and the guitar solo. I think it turned out looking much better having done it by hand though. I also like that some parts of it have that hand-choreographed feel, but others still have that jumpy behavior of being associated directly with the audio.

Trusty Fadecandy.

I’m proud of the result! I had a lot of fun learning about audio processing and visualization and some refreshers on electronics which I hadn’t done in a long time. This project is also opening my eyes to all the cool potential future projects I could do with Fadecandy and other Adafruit products. I think I’ll definitely want to play around more with LEDs and light art in the future.

SpongebobGoneWrong

This is a 3D printed model that can cast a shadow of Spongebob. Inspired by artist Diet Wiegman, the goal of this project is to create a model that looks like some crazy Cthulhu monsters and have a shadow of Spongebob.

Things went well:

The shadow turned out well.

The 3D print:

This project is printed by Formlabs Form 2 3D printer with grey resin(it works and it was the only option). The detail of the model was very well preserved. After it’s printed, I only spent about 20 minutes to clean up all the support structures and I could get the shadow already.

Things didn’t went well:

The 3D model

The 3D model was built in Zbrush and inspected in Maya. Zbrush does not have the tool to set a light scource in a specific place and have an object behind the model to receive shadow; therefore, the model is imported into Maya within a scene contains a focus light and a large plain to receive the shadow.

Basically, I blocked in a general shape in Zbrush, imported it into the maya scene, then imagined how to modify the model to get the shadow I wanted, and lastly go back to Zbrush and sculpt on the Zbrush file. Because my brain is not that powerful, so the possibility of the model have been significantly shrunk. The silhouette of my 3D model still looks very much like Spongebob, which is not ideal. Plus I didn’t have much time to work on the details of the model.

If somehow I can find a 3D package that allows me to model with real time shadow casting, the product will have much higher quality.

BTW I can see why Wiegman didn’t create art pieces similar to my concept because making one thing to have a shadow of another thing is really hard.


note: Don’t try clay at home if you don’t have the TECHNOLOGY.

Final Suitcase Post!

Overall, I am very happy with the outcome of this project. I have learned a lot about how you can turn objects into art and while I may not have used the techniques we learned in class, I still learned so much!

This class was always so fun to go to and I loved learning about all the ways you can use art.

As I mentioned in class, I could not do the second suitcase because it was too hard to carve. The material was too thick and got on my tool really easily or sprayed hot plastic off in all directions. There were also strings inside the suitcase so when they got tangled in the tool, it whipped around and could hit my hand.

Thanks for a great class and good luck with the rest of the year!

Megan

Jamie – Project Complete!!

Hi Everyone!

My project is finally done! It took a lot of experiment, but I did it. The final result of my project is a metal flower by day and a galaxy at night. My concept goal was to transform one object into another and that is exactly what I accomplished and it turned out exactly how I wanted it. The light medium that I used was light projection. Meaning that I used the light itself to make the image and used different reflective surfaces to create the image.

There was a lot of testing and experiment for this project. I experiment with different metals and saw how that light reacts with each piece and from this I chose aluminum, steel, plastic, and copper. Each have unique light reflection quality, but also they look very nice together. I want to point out that the flashlight I used was an atomic beam which produces 5000 LUX!

To acquire these materials I used our machine shop with the aerospace department and took scrap metals to make the flower parts. While machining I tested out different spacing and thickness to add dimension to the flower and the light patterns that it makes.

I used a regular glass sphere vase to hold the flower. This severed as the pot. I made my base out of a milk carton and some duct tape  (platform) to keep things cheap and it turned out pretty nice. I bought the solid metal piece (holder) that holds the pot from Home Depot for about $5.00 so it was a good deal. Although the size was slightly different between the platform and the holder I used some clay to mend the space between them.

Following the structure set up I decided that I should see how it works all together. Here were some of the pictures that I captured:

I was very pleased with how it turned out but felt it was missing something…..it was color! So I decided to test out different ways to add color. I started testing with some small piece of glass but it wasn’t capturing the image enough. So then I tried some construction paper but it was a little too thick and took away from the reflection, but it did add the right amount of color. So I looked for some thin paper and then found sticky notes! It worked great! I started with on color original, but the finish product uses two different colors. Below shows the finish product:

Thanks for the great class! I had a lot of fun with this project and everyone! Have a great break!  🙂

Jamie

Final Update: Guitar

EDIT: If anyone looks back at this, here’s the entire photo album of the guitar project. It has some more test videos I didn’t show in class, and it’ll be updated as I continue working on it, I promise.

https://goo.gl/photos/n8DbF3Jr94vK7cAm6

Unfortunately, I also need to laser cut a new pickguard. After cutting the final cutouts for the hardware, I realized the holes were too large and I wouldn’t be able to use them for mounting.


I wish I could’ve gotten to everything I originally intended to, but I found myself too busy over the past two weeks, along with a couple unfortunate events. After missing my time slot on the laser cutter, I was unable to meet up with my brother so we could rewire all the hardware onto the new pickguard. This means the guitar is still currently unplayable, but it’s not far off from so.

The guitar itself still has the potential to be finished once I have the time, and it looks pretty good at the moment.

I was trying to capture some test recordings of the lights performing with music in the background, and I just happened to line up one of the codes with one of the songs by complete accident…. so I did it again a few more times.


If I had more time to work on this, the guitar would be playable, and I would have more permanent and more concealed way of attaching the strips to the guitar. On the lights aspect, I’d like to have code that’s specifically programmed to individual tracks to more accurately depict the tone and atmosphere of each song (I’d also like to have the rings wired up, but I fell short on wiring supplies). I think I’d also want to fabricate a small hard enclosure so I can mount the Arduino on one of the guitar’s faces while keeping it safe.