I have chosen the long animal project. I did not have a lot of time to work on him this week due to a crisis at work, but this is what I have so far.

Fairy Lights
I decided to use some Neopixel RGB fairy lights from Adafruit, which I have ordered but they haven’t arrived yet. I will be controlling them with an Arduino Nano. Because I want to mount this project on the wall, I considered a few options for powering it. While I do have a wall adapter power supply, I don’t want an obvious chord hanging off of the animal. I decided using a phone battery bank might be a good alternative, since it’s 5V and rechargeable. To test this idea, I set up an Arduino nano with a blinky program and ran it off of my battery bank.
Paper Maché Mold
I want to create a shape out of pink insulation foam which I can use to create the exact shape I want out of paper mache. I purchased some insulation foam from home depot, but I haven’t laminated the sheets together yet. I am working with the makerspace staff to set up a time for them to teach my how to use the CNC router, because I think that will be the easiest way to achieve my desired shape. I don’t have a lot of experience carving this foam by hand, and it would be difficult considering the complexity of the shape.
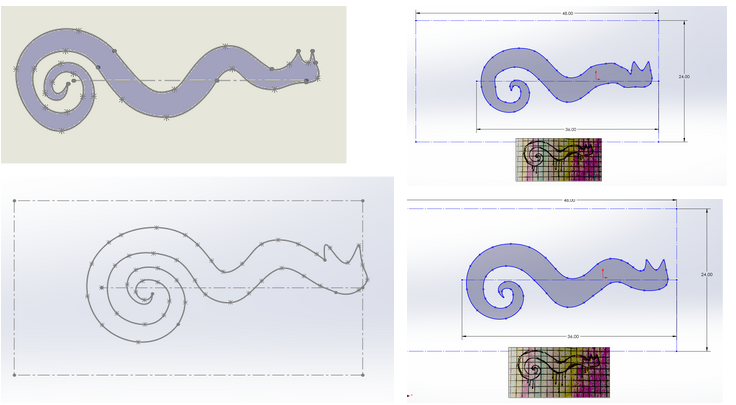
I started working on a Solidworks model of the animal. It is really difficult to get the correct shape, because I want the geometry to have an organic look and feel. I achieved this result by pasting an image of my paper sketch into Solidworks, and then tracing the outline with points. I connected all of the points with splines, and with some minor edits I achieved the outline I wanted.
To create the 3D model, I tried using surface tools, which I am not extremely familiar with but would like to learn. I haven’t gotten the surface model to work correctly yet, and the closest result I have gotten is still not aligned with the curvature I drew. Using surface tools would allow me to machine the 3D profile to almost exactly what I want, minimizing the amount of sanding and post-processing I would need to do.
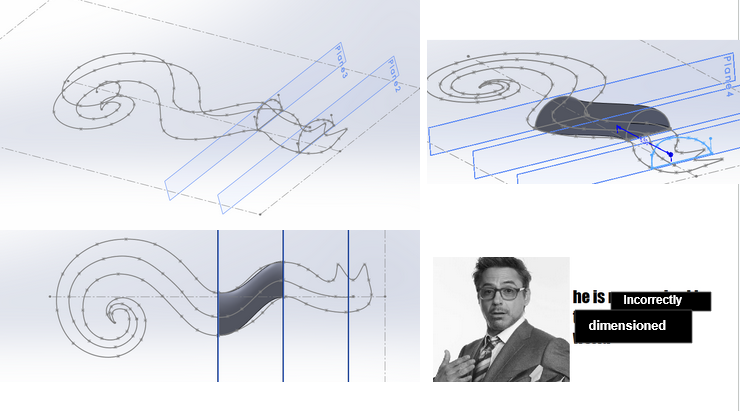
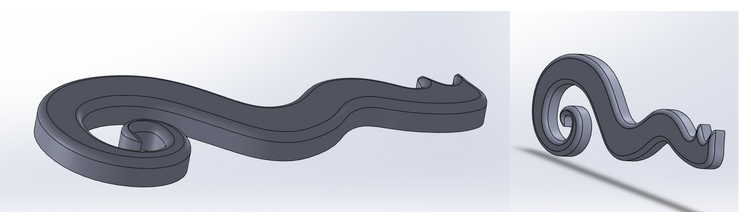
If I can’t get surface tools to work in time, by backup plan is to simply extrude the profile I drew and put a large fillet on the edge. This method does not get me as close to the final dimensions, but will do in a pinch if I can’t get anything else to work. I can easily sand this shape into something with a more rounded profile.
I also measured out the dimensions of my Solidworks model and sketched it on a piece of paper to make sure I was modeling the size I envisioned.

Next Steps
I have a lot of work to do, but some of my next puzzles include:
- Determining how he will mount to the wall. I plan on using a foam board backing to mount the paper mache, but I’m not sure how to attach the board to the wall
- Design an easy way to change the battery or remove LEDs. I don’t want to have to take it off the wall to remove and recharge the battery
- Purchase the Dangly Bits. I want to have little charms hanging off of the animal to give the suggestion of legs, but I also want them to refract the light a little. I’m imaging some kind of rhinestone jewelry from the dollar store
- The Dangly Bits need some reinforcement where they attach to the animal, because the paper mache is very thin and not structural
Shopping List
- Ingredients for Dangly Bits
- Clear Marbles (eyes)
- Foam board (white)
I like the concept and the way you are approaching the problem. For your battery, I would recommend that you calculate the amount of Amps each component uses and how many hours you want to have it on. That way, you can then compare battery sizes, since all batteries are measured in Amps-hr.
I like how you are approaching a paper mache project with such precision. I would not expect to use a solidworks model and CNC router to create this, but I think it will result in a very polished result.
Not so familiar, but if what you tried to do won’t work, maybe try adding chamfer excessively?
Hi Elena, this looks really cool and I am very impressed with your CAD skills. I was wondering about what material you would use for the mold that you are making in solidworks? Also would you print part by part and then paper mache each part and connect? or are you trying to piece together the mold and then paper mache the whole 3ft?