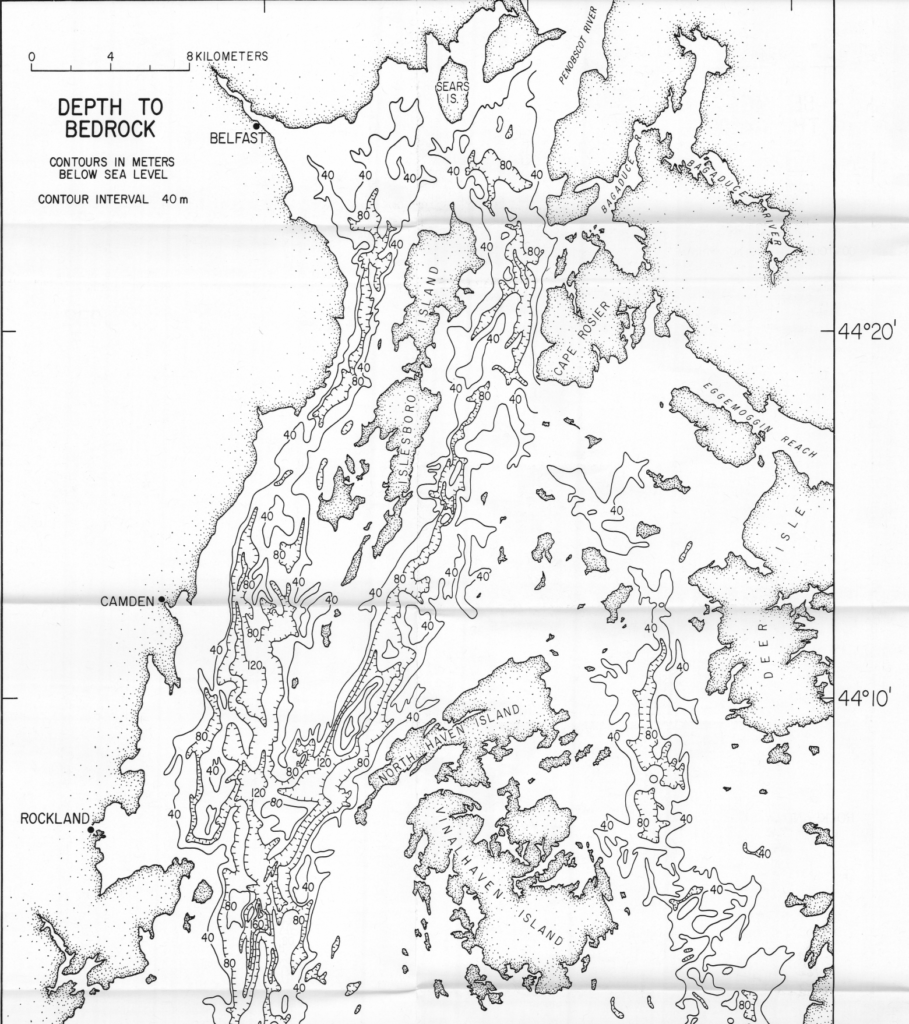
Bathymetric Map of Penobscot Bay
For my layers project I will be creating a 20×20 inch 3D rendering of Penobscot Bay in Maine. Penobscot Bay was an easy choice because my mom’s side of my family owns a converted 1800s Bed and Breakfast in Brooksville that has been in our family now for a century. The property is called Sea Winds and I have been vacationing there my whole life. As the name suggests the ocean is in view from the property and so the connection between that place and the water is strong for me.
I will use layers of ¼ inch Baltic Birch plywood to create an accurate representation of the depth of the ocean surrounding my family home. This place is where I learned to sail and so knowing the channels and unseen ledges is something I already practice in my life. For this project I will only use layers to physically represent the depth of the ocean and then use raster engraving to recreate the topographic lines of the surrounding land. For any lakes (Walkers Pond) I will cut out the shape and have the first ocean layer show through. The way that topographic and bathymetric maps use a single line to represent a single value of land elevation or ocean floor depth works so well when translating to laser cut layers stacked ontop of eachother. Because the lines will more or less flow the same general shape as they move up or down the space the final art should naturally draw the viewer’s gaze towards the concentric shapes.
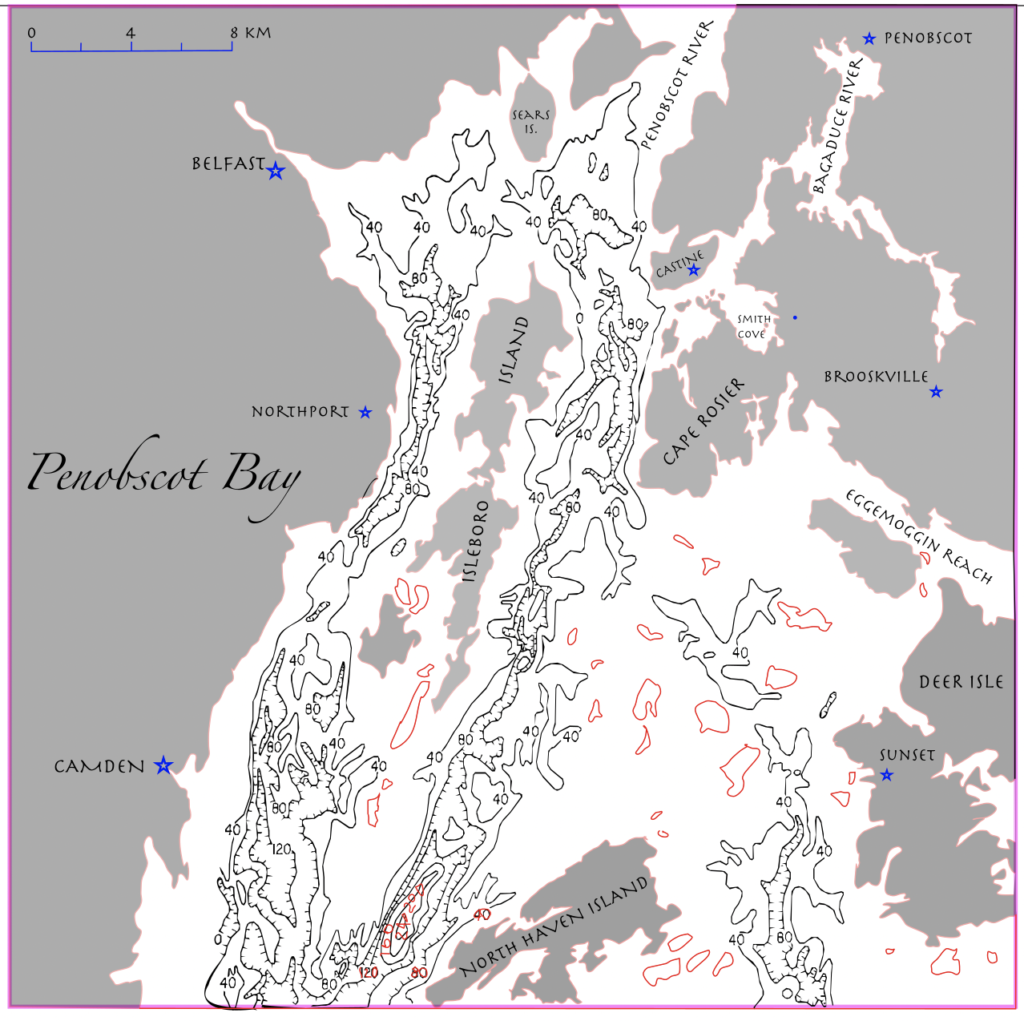
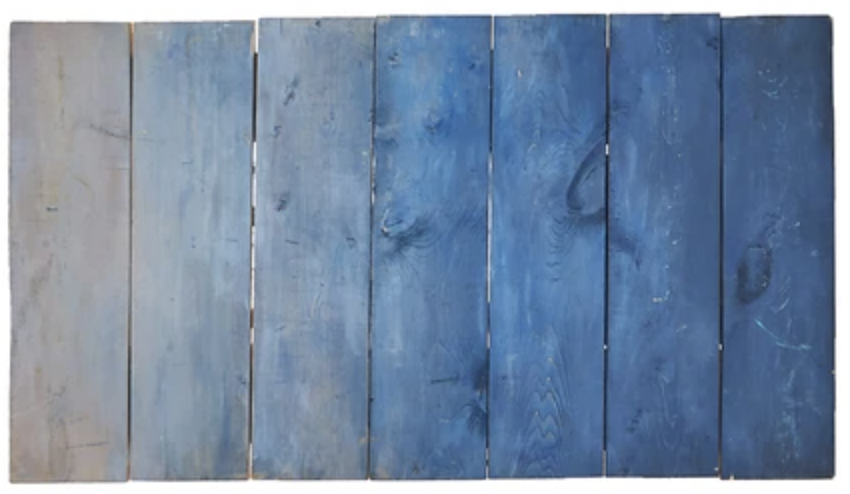
For colors I will only use a light blue wood stain on the layers representing the water and I will leave the land natural wood with a sealing stain. In the water I will increase the number of stain coats as the depth increases, this is to reinforce the perception of the ocean floor moving further away from the viewer. The final effect should be bright land, from the white wood of birch this will be easily created, contrasting a bright blue gradient of the water layers. Something like this gradient of blues is what I am hoping for.
Inspiration
The “Below the Boat” layered artworks were the main inspiration for this project. However, even before seeing all the different examples during class I was thinking about doing something with Cape Cod and the ocean depths because Cape Cod is the other place where I often experience the ocean in my life. Then the in-class example of “Below the Boat” was a map of Cape Cod and I knew I should probably choose another location, so Sea Winds and the waters I sail seemed the perfect choice. From these pieces I take the idea of using stained wooden layers to recreate the ocean’s depths around a single layer of land. I will not include road lines on land however, instead I will have the land topography with the names of prominent towns, Islands, coves, rivers and the Bay. I will also include normal features of maps like a title, compass rose, distance scale, and depth labels for the water.

The second piece of layer art that I wished to incorporate was the Abyss Table. I really enjoyed how the layers of blue acrylic darkened as they increased in number so I decided to try to find a way to recreate this effect by using multiple coats of blue stain on my water layers.

Hi! Do you plan to include the names of the different land features in your piece?
Hi, thank you for this question! Yes, I was planning on vector engraving all the names shown here on the various layers. I have also added the depth markers in some places as well that i will vector engrave. Because I plan on staining the layers I think the engravings will show through it, at least that’s the hope!
Hi Iris! Will you be using the 1/4 inch wood for the map layers as well? Have you thought about staining the land features with a neutral wood color or framing the finished piece?
Hi Lauren, yes I’ll use the 1/4 inch plywood for each layer (total is 6). I was thinking about staining the land layer but I haven’t bought the stain yet so it might be something I only do if I have time. Framing is something I hadn’t thought of yet so thank you for bringing that up! It would look nice with a frame but i actually love the way the abyss tables look with the visible layers on the side so I think I’ll leave them unframed.
Hi Iris! This is a very cool idea! I was wondering what is your plan for the smaller island pieces ?
Great question! I realized just a few minutes ago that the tiny islands might fall through the grate in the laser cutter. I reached out to a friends who says that there is a catch in place for that reason and so I’ll will try to make sure I am able to recover them to use them on the final piece. Some details and islands were just too small to even consider adding, so I will use my best judgment and won’t include these in the final project.
Hi Iris! We have very similar projects, I am also creating a map of a vacation place in Maine where my family has gone for years! I am wondering how you replicated your map so perfectly in inkscape. Also, have you had any success using the Terrain2STL software?
Hi! I just saw your project and was so excited to see maine vacation spots represented! To lake each layer edge I used the “draw freehand lines” pen set to a rougher smoothing setting around 2.5 for the detailed land edges and higher smoothing at 6.0 for the lines in the water. I had to increase the smoothing because I was finding that inkscape was adding way too many nodes and my mac was getting very slow. I had no luck with Terrain2STL unfortunately, my area was so large and the land topography not varied enough that no real usable data came through. So, I ended up manually tracing the map I found which took forever.
Your map came out stunning, Iris! Very clean. Do you plan on adding any final finishing sealant or will you keep the rawness of the wood?
Hi! Thank you so much! this was a real rough draft so the water lines are even cleaner now. I am hoping to seal the wood after it is totally done, yes. It might be that with the drying time of each layer I won’t be able to have it sealed my monday but hopefully I will by the end of the term.