Author: John Williams
Progress Report 2
Progress Report 2
My LEDs arrived, and I wired them up on my breadboard I used three 1.5V batteries in series (4.5V) as the power supply. I used a battery holder taken from a flashlight. I was initially confused that each LED had four pins, but apparently each pin is connected to one other pin such that there are effectively two pins. I wired the LEDs in parallel, giving each one a current limiting resistor. This resistance was chosen so that the LED current would be the nominal value of 20mA. The forward bias voltage is 3.2V, so R=(V Battery – V LED)/ i LED = (4.5-3.2)/20E-3 = 65Ω. I didn’t have 65Ω so I used 100Ω and 200Ω in parallel for 66.67Ω.

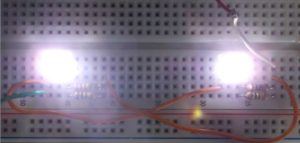
I also made a rough test setup to see if shadows would be actually 3D. I just used books and a box to hold up the paper. I tested the following transparent items: Tupperware lid, eye glasses, safety glasses, drinking glass, empty clear tape dispenser, clear ruler, plastic bottle. The results were spectacular! It worked just as I thought, and the orientation of the objects was mirrored across the page as predicted, meaning that the part of the furthest part of the real object is the closest part of the virtual object.

I took some pictures to see if they would still be as 3D when viewed on the computer. Unfortunately, either the camera or the screen shifted the color slightly so that you can see a little bit of the red image through the red lens, which you are not supposed to. So, the effect is best when seen in person because the second pair of 3D glasses is filtering the light sources to exactly the right colors.
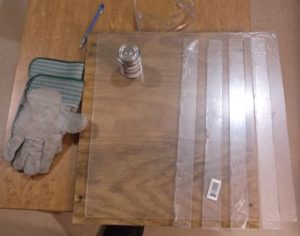
I bought an 18” x 24” x 0.9” sheet of Plexiglas from the nearby Home Depot. I cut it by scoring it with a straightedge and razor blade and breaking it over the edge of the table. This worked except for one of the sides, which cracked in half. I think the problem was that the walls are so short so there is less leverage and a lot of force is required, and it is harder to keep the force evenly distributed. I am hoping to put this wall back together with the solvent glue.
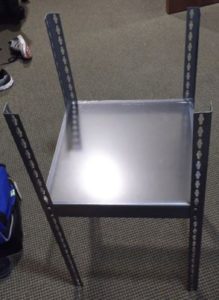
On the framing front, I remembered seeing a reusable shelving system in our basement. It was a metal frame that could be assembled many ways and used to slide wooden shelves into. My parents were coming up for the weekend so I asked if they still had it and if they could put into the trunk. It was just the right size.
Progress Report 1
Progress Report 1
I started thinking about materials and implementation. The main parts of the design will be: 3D glasses, paper (or similar) to project through, a transparent water tray, light sources, and some kind of frame or scaffolding to hold everything in place.
I ordered 50 3D glasses for only 40¢ from American paper optics.
For the transparent water tray, I immediately thought of a Pyrex baking dish, but these are small. Then I thought of ripple tanks for physics experiments, but all of the ones on amazon and ebay come with vibrating wave makers which make them expensive. Then I found some youtube videos of how to make your own aquarium from Plexiglas and special solvent cement. This seems cheapest and not too hard. Maybe I can figure out how to laser cut the Plexiglas – I see robotics majors do it all the time.
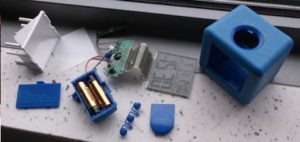
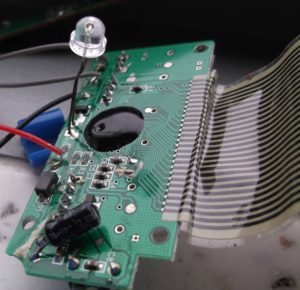
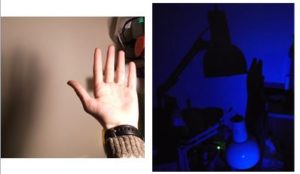
I first pictured the light sources as spotlights. However, these must be far from the subject to create hard shadows. I needed a point source such as a very bright LED. I needed to find an unusually bright LED to experiment with, so I took apart my alarm clock (see below) and used the one inside.
It created very crisp shadows, unlike my desk lamp.
I was worried about finding the exact red and exact cyan that would be compatible with the 3D glasses. I came up with a clever solution: just use white LEDs and filter the color with a second pair of 3D glasses. I then ordered some white 10 lumen LED’s (which is apparently very bright) from a website called superbrightleds.com. Aptly named!
Finally I thought about the frame or scaffolding. I have seen reusable metal prototyping channels, called 80 20, used in several MQP’s and at my summer job. They would be ideal, but unfortunately it would cost about $70 for the amount I want. A cheaper alternative is to make something structural out of cardboard. While it sounds like a weak material, it can be quite sturdy when there is enough of it. Prof. Rosenstock suggested PVC which I think is a great idea.
Project Ideas
I have three ideas.
1) 3D caustics
2) Moving color pattern
3) Spinning reflective curve tracer
I will go through each of these.
- 3D Caustics
I have fooled around with 3D glasses before. For example, I have combined photos taken an eye width apart into 3D images using Photoshop. Something that has been in the back of my mind for a while is: could a 3D image be created another way, without Photoshop or even computers in general? According to Instructables, people have already made multiple types of camera attachments for this purpose, so I guess that was not an original idea. The concept of this class, ‘Light art’, and artists who use light to project shadows, gave me a more original idea: to create 3D images without even a camera by using shadows. If two light sources are mounted an eye width apart, one red and one cyan, the shadows projected should theoretically be viewable under 3D glasses. This is because the two light sources are analogous to the two eyes of the viewer, ‘seeing’ the object from two directions. The 3D glasses show each of our eyes what just one of these light sources is ‘seeing’. I made the sketch below to illustrate this.
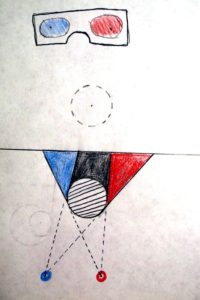
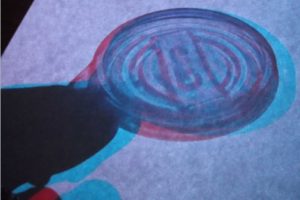
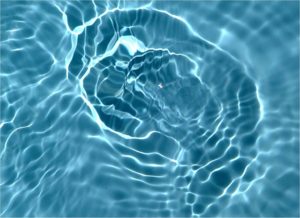
Notice that the image is projected onto paper and seen from the other side by the viewer. The positions of the eyes and light sources are mirrored across the plane of the paper, so the perceived 3D object’s orientation will be mirrored from its actual orientation. Also, the red light source must be on the same side as the red lens. Perhaps this technique could be combined with raw film to preserve the images without a camera? However, it is more of a demonstration than an interactive piece. I was brainstorming about project ideas with Alex Wald and he mentioned that he might use fluids in his project. This gave me the idea of viewing caustics in 3D. If you haven’t heard of caustics, they are refracted patterns such as those seen on the swimming pool floor, pictured below.
Caustics would be an interesting subject for two reasons: 1) the user can interact with the water, and 2) the 3D shapes visualized would not a direct representation of the physical fluid shape, but would visualize the data in another way. These shapes would still be 3D, because of the two light sources, but what would they look like? What would their properties be? I would love to play with this!
- Moving color pattern
My roommate recently got an RGB strip for the room. It came with a remote with many colored buttons. I noticed that when viewed under the changing lights, the colored buttons changed drastically.

I was aware of this effect before, but this reminded me of it and gave me an idea. Could a printed color pattern be made such that as the incident light color is varied, the pattern appears to animate? The pattern could be printed out, and the incident light could be supplied by RGB LEDs or by light passed through a multicolored rotary filter. In developing this, my first step would be to consider the motion of the darkest area as the light changes. Maybe I could start with something simple like dark spots moving around a circle?
- Spinning reflective curve tracer
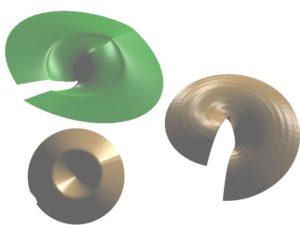
This is an idea that I already started working on this summer (is that cheating?). I was a passenger on a long road trip on the highway and I was looking at the hubcaps of the other cars. I noticed that as they spun in the bright sunlight, they traced out intricate patterns. I started to wonder, what if this process could be reversed? What I mean is, given a desired curve you want the hubcap to trace out, can you design the hubcap that will produce it? One novel application would be to allow a car company to advertise its logo on the hubcap in a very eye catching way. I did a lot of math and thinking about this, but I won’t bore you with the details. I will summarize the basic idea. I first made the simplifying assumptions that the sun is infinitely far away and your eye is at the same height as the hubcap. Then, any point on the hubcap that is bright must be inclined at 45 degrees at that time to reflect at your eye. Using this insight, we can determine the slope at any point on the hubcap. Slope is the same thing as derivative, so the three dimensional shape of the hubcap can be determined by numerical integration. I wrote a program in Matlab that takes in the desired curve, finds the 3D point cloud by numerical integration, and saves it to a file. This file can be imported into Solidworks and tampered with. The next step would be to CNC machine or 3D print it. It would have a rough surface if 3D printed, but I read online that 3D printed parts can be given a mirror smooth polish using acetone vapor. There is some flaw in either the math or the code because the hubcaps don’t reflect exactly as they should in Solidworks. What if it takes a long time to fix? Below are pictures of some output shapes.
I am leaning towards 3D Caustics.
Short Bio — John Williams
My name is John Williams and I am a Junior doing a double major in ME and ECE.
I like to draw all kinds of things, from cartoons to still lives. Sometimes I like to use chalk pastels on cardboard because it makes shading more fun and you can add both lightness and darkness, whereas you can only add darkness to white paper.
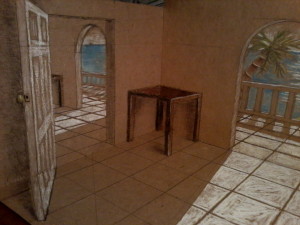
My main interest recently has been exploring the rules of perspective drawing. I love geometry and compass/straightedge constructions as a way of ‘graphical calculation’. As a few examples, I figured out a way to draw icosahedrons in accurate perspective without using calculations (not sure if my particular method was previously discovered), how to rotate a line in any direction while preserving its length (projected length may change), and how 3 vanishing points in mutually perpendicular directions can be used to graphically locate the vanishing point in the direction perpendicular to the page. I could go on and on! I love perspective. I also like to play with anamorphic distortion(such as the wineglass below) and nontraditional perspective such as fisheye and cylindrical. The other picture below is a room assembled from three pieces of cardboard in different planes (one for each wall) and appears to have depth when viewed from the right position (for example, the floor lines match up, even though the pieces of cardboard are in different planes).

Although I am studying ECE, I have never done a significant hobby project just for fun.
As for programming, I know java, C, and Matlab. I have also done artistic visual programming projects. The most interesting one was Moiré pattern animations. The idea is that two transparent patterns moving on top of each other, such as window screens, produce a moving interference pattern. This can result in a planned animation if the two underlying patterns are computed. If one of the two patterns is vertical bars, the other can easily be treated as the frames of the animation. This idea has been used before, but I came up with an interesting addition: If one pattern is a grid, the animation can proceed differently depending on the direction that the layers are sliding. I have uploaded Photoshop files of these – to view them you simply drag one of the layers. I couldn’t embed the Photoshop files here but I uploaded them to the media library. Check them out, they’re worth your time. I have also printed these out on clear acetate and they still work. I have also done programming projects that involve 3D glasses.
As for other creative arts, I like to read and write poetry, although it’s been a while since I’ve written anything.
My creative inspirations are math, nature, and the artists I find on the internet.
My artistic goal is the satisfaction that comes with creating something new.